Solid wood vintage coffee table, yes please!! Especially once updated in fresh beachy colors.
Step one: SCRUB WELL and let dry!
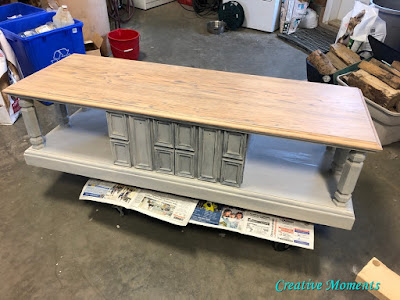
This solid wood beauty was given to me by a neighbor who was downsizing her stash, thanks Cara. I knew it had loads of possibility as I have done a few similar vintage coffee tables like it. A recent
one in farmhouse whites and this one below many moons ago.
Step two: sand all the old finish off the top.
It was then hand sanded on the edges to remove the old finish along there as well.
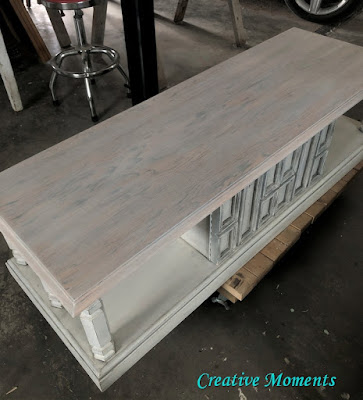
My initial plan was to give the bare wood a white wash look. I chose
Weatherwood
Stains white maintenance oil applied with a blue shop towel and wiped back after it soaked in for about 10 minutes. The top part has the oil applied, it hydrates the wood too. Two coats were applied and left moving on to the base.
NOTE: There was an area that I had filled using
DAP
wood pro-x wood filler below
But seeing it has a pink indicator that shows when wet, the milk paint reactivated it after it dried to a wood tone. To resolve this I sprayed a few coats of
Zinsser
Bull’s Eye spray shellac . In the future though I would use regular
DAP
wood pro wood colored to avoid this issue.
To add more dimension but keep in the light beachy tones,
Homestead House milk paint in limestone was brushed all over the marzipan.
Then all layers were sanded smooth with a
sanding
sponge as well as the edges and detailing distressed. Then the entire base was clear waxed using
Homestead
House Wax.
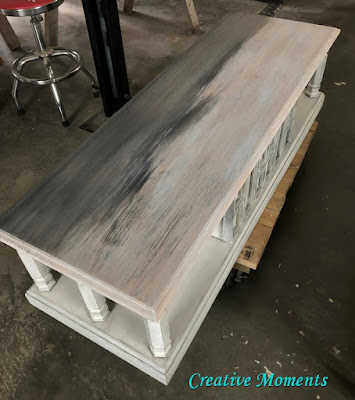
I felt the top was too orangy even with the white oil so needed a plan b. Using the
Homestead House milk paint in limestone a wash over top was applied then sanded.
Another wash of
Miss Mustard Seed's in shutter grey was applied and sanded as well. Then I mixed a black milk paint I had in the fridge with the shutter grey and brushed a more solid coat on.
Using my
spray
mister as I went to blend all the milk paint layers really helps.
This is the wet layers.
The original hardware was scrubbed and dried.
Krylon spray paint in oil rubbed bronze was sprayed on them.
However it was too dark for the beachy look so another plan b was in order.
Plan b for the hardware was Krylon satin nickel which looked so much better.
I LOVE the plan B top!! Do you?
I did not have appropriate baskets in color or size but think proper ones would look great.
July 28, 2020
Shared up at


That looks really great! It's interesting how the whole style of the piece changed, just by changing the color. I love it. Thanks for sharing it at the TFT party.
ReplyDeletethank you very much. Isn't it amazing he power of paint?
DeleteAre you drying in between wash’s and solid coat?
ReplyDeleteThank you so much so sorry for the delay in replying as this was found in an awaiting moderation folder ;(
DeleteSome of the layers were done while wet and some I let dry
You did well try and painted coffee tables beautifully, thanks for sharing amazing ideas.. I will execute on Coffee Tablesand rest of others as well.
ReplyDeleteThank you so much so sorry for the delay in replying as this was found in an awaiting moderation folder ;(
DeleteReally beautiful
ReplyDeleteThank you so much so sorry for the delay in replying as this was found in an awaiting moderation folder ;(
DeleteReally beautiful
ReplyDeleteI love what you did.
ReplyDeleteAre the steps posted anywhere or do I need to write them all down in the order you followed ?
I’ld like to try this on a bedroom dresser.
Thank you so much so sorry for the delay in replying as this was found in an awaiting moderation folder ;(
DeleteFollow the steps as I show above as well as check out many other tutorials I have done here too
I am so in love with this coffee table. Thank you for sharing.
ReplyDeleteThank you so much so sorry for the delay in replying as this was found in an awaiting moderation folder ;( I am catching up on them now :)
DeleteThank you so much so sorry for the delay in replying as this was found in an awaiting moderation folder ;(
ReplyDeleteI am so happy to inspire, that is what keeps me writing and sharing these tutorials :)