Can you go wrong with dark stain and a lovely shade of blue?
I have had this antique dresser in my stock to paint for some time now waiting for just the right color combo makeover.
I love when they still have their original makers tag; this one is from The Bell Furniture Co. Ltd. from Southampton, Ontario starting up in 1907.
It has classic styling and lovely carved designs in the drawer fronts with sweet key holes. However I did not notice when I purchased it that ONE of the original knobs must have been lost and swapped out for this bottom one ;)
As per usual, all my pieces get a good scrubbing with warm, water, soap and some TSP. See how dirty the water is, this ensures the paint will adhere well if all the past gunk and grime is removed.
Then rinsed clean and left to dry.
I love to keep wood when I can and these dresser tops are my favorite so using a good furniture stripper (which I have found is slowly phasing out of our local hardware store) I took it to the bare wood. I also did the drawer fronts seeing they had such pretty carved designs.
I find most antique pieces need a few repairs. This one needed a drawer runner reglued in place and 2 missing drawer stops added. My stock of these are running very low.
The sides were lightly sanded to smooth the finish , all was wiped again to remove sanding dust and here is the dresser ready for the next steps.
I applied 3 coats drying 4 hours between coats minimum and sanding with fine sand paper between coats. There is one tip I would like to share. See the area to the right above? That dull area is due to the wood absorbing at a different rate. In the future I wood apply a wood conditioner before the stain/ finish. Another tip is to work fast in long even strokes keeping a wet edge and do not go back over it after about 30 seconds.
Applying a 4 coat with the above technique made for a perfect finish.
The body is going to be painted this lovely deep lagoon blue from Jolie Paint.
Two coats using their signature brush went on perfectly, above is the first coat wet.
I chose these wooden knobs to replace the original seeing one was missing.
They were painted deep lagoon as well using a cardboard box as my paint stand.
Then to give dimension and ageing Jolie's black wax with the pointed wax brush was applied around the edges. This pointed brush was fantastic for this job!!
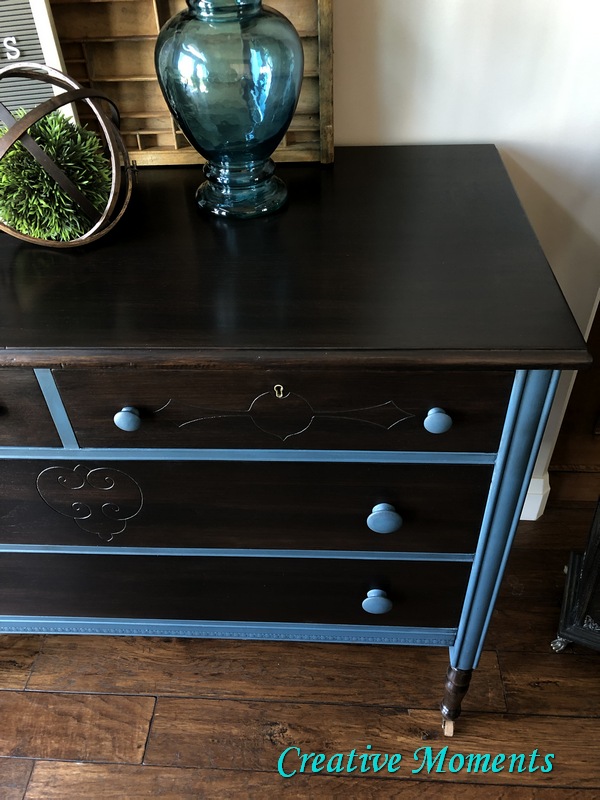
Doesn't it look lovely?
I like to have a brush for each color so there are no issues when you need to use clear wax after applying dark waxes.
I added a couple of the painted knobs to see what I thought of them.
And I liked the contrast of the dark stained wood and the aged blue paint on both the body and knobs.

Antiques see so much wear over the years and these drawers were in dire need of a makeover. On the right you see I hand rubbed a good coat of Daddy Van's hemp oil inside and outside of the drawers on the sides and back and under on rail edge. This rehydrates them as well as gives them a smoother glide.
For the inside bottoms of the drawers I cut and applied removable drawer liner.
The knobs were all put back on along with the cleaned brass keyholes and it was ready to go.
Email me


This project has my affiliate link to Jolie Paint; prices do not change when you purchase paint and supplies thru the link, They do however give me a small credit to continue creating more amazing pieces using Jolie Paint.
FEATURED AT
Embracing Change
Sept 24/19
Linked up at these fun parties


bookmarked!!, I love your web site!
ReplyDeleteThank you so much so sorry for the delay in replying as this was found in an awaiting moderation folder ;(
DeleteTHANK YOU!!
That piece is amazing. I also appreciate that you explain everything clearly, even indicating what brushes work well for you. Thanks. I look forward to more projects.
ReplyDeleteThank you so much so sorry for the delay in replying as this was found in an awaiting moderation folder ;(
DeleteI hope you have been enjoying many of my projects since
Excellent blog here! Also your web site loads up very fast!
ReplyDeleteWhat web host are you using? Can I get your affiliate link to your host?
I wish my site loaded up as fast as yours lol
Magnificent site. Lots of helpful information here.
ReplyDeleteI am sending it to some buddies ans also sharing in delicious.
And of course, thank you for your sweat!