So it turns out the last dining table I thought I did for our own home sold soon after sharing. Luckily I have a few more dining tables in my stock to paint pile to choose a new one from. This Duncan Phyfe style table was gifted to me from a young fellow and it was his great- great grandparents table!!
I hope they would be happy to see it back in action.
These were the photos he sent when he asked if I wanted it.
Of course I said yes. My mantra is "make the old look new again".
This one was going to need a lot of work but I would do my darndest to revive it. Heads up this is a long and detailed tutorial with lots of photos and videos shared for your viewing pleasure and knowledge.
After it was picked up and brought to my work shop, it was time to start
gluing the lifted veneer edges from being out in the elements.
Here is my veneer gluing video to help show how I do my repairs.

The table top was set on my work table and the makeover began.
The finish is old and perfect for removal via carbide scraping.
first carbide scraper video demo
The table was flipped on its side, the spiderwebs and leaves vacuumed from the underside. Then it was given a good deep scrub using
a TSP alternative cleaner with a dash of dawn in a bucket of warm water.
Then it was put back on the work table; more veneer edges were glued and the table runners were brushed with
Dixie Belle Big Mama’s Butta to make them slide smoothly.
Then it was back to scraping the table top using my poor man's dustless sanding system (video above)
I continued the scraping process till all the finish was removed.
And there were more veneer edges found that needed to be glued down.
This is the butterfly leaf with a much more intact finish showing closer to what original color and finish looked like.
I had my husband help me flip the table top. I set the pedestals on to see the whole look a bit better.
The small
carbide
scraper was used to scrape the underside clean of any old finish then power sanded smooth.
A corner block was
glued and clamped back in place after staples and other bits were removed from the underside center.
The finish was removed from the table apron edges using the
carbide scrapers carefully going with the grain.
Using my thumb pushing up from the bottom got it very close to the 90 degree edge.
More loose veneer edges were found and
glued and left to dry well.
It was interesting that the table and the leaf did not have the same numbers.
It was time now to move to the 2 pedestals. First step was a deep clean. The brass toe caps were removed and the toe area scrubbed well too.
scraping the pedestal videos
I have used a lot of
wood glue on this project but its use continues. A few of the legs had cracks at the toe area that were glued and clamped.
And a few other places with all left to dry well.
Folded sanding paper was carefully used to sand the crevices.
And more power and hand sanding, whew! This is progress so far.
Watch my staining video
Then I moved back to the top.
It looks so lovely bringing out the amazing wood grain.
The table was flipped again; my workshop is my gym :)
Each coat is left over night to dry well with a light sponge sand before the next coat. 3 coats were applied.

A 3rd coat of natural goes on all.
And left to dry.
To clean the brass toes I took a chance and used powdered household cleanser and look at the difference.
before and after
The caps were put back on the table toes.
The combination is amazing!!!
The top was hauled in and set in place

But the top is much lighter having had more sun exposure and use.
See the color change underway
I love the darker color added to the top.
Once this coat dried the next day another cappuccino was applied.
The leaf of course had veneer edges needing gluing too.
The scrapers did not work as well on the leaf finish.
A stripper video for you :)
This is what the scraped surface looks like, next step was to scrub with water and a brush to neutralize and remove left on finish.
scraper video on tougher finish
Up next was a power sand. There were a couple dings that were wood filled too and sanded smooth.
When the leaf was flipped over it was scraped,
and sanded and more edges glued.
And more edges.. now it dries overnight.
The next day clamps removed, the surface power and hand sanded a coat of butta brushed on to rehydrate the wood.
The leaf top had a final hand sand, wipe and the first coat of natural stain oil applied.
On the wood filled areas I used a stain pen to darken. Two more coats of natural went on and 2 of cappuccino just like the full top.
The table top was paper bag sanded. Did you know a paper bag is like a 1500 grit sandpaper, very fine and creates a super smooth finish.
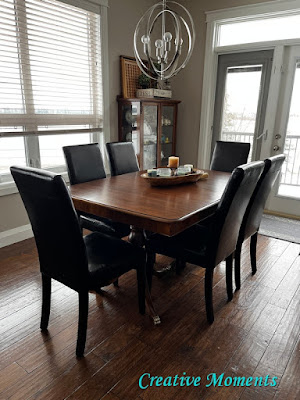
This table looks fabulous don't you think?
Lighting makes it hard to get the true color but the true color is truer shown above.
This table has taken MANY MANY hours to complete which reminds me why I do not take on full restoration projects often but the end result has me very proud of the work put in.
Once the butterfly leaf was finally finished I put it in place but as you can see better in the above left photo the leaf even though all the same steps is darker due to the wood being hidden allot of the time. To solve this I added another coat of cappuccino to the table ends and it blended perfectly.
To secure the butterfly leaf in place, the holes were cleaned up with a drill and new dowels added.
Once it was set securely in place with the legs pushed together and in place the screws were put back in to secure all firmly.
New felt pads were put under the brass "button" at the base of each leg for ease of movement on the hardwood.
FEATURED ON
Shared up at these fun parties


Wow LeeAnn, that is a lot of hard work and alot of great information. Thank you so much!!
ReplyDeleteThank you so much for the kindness Cheryl!!
DeleteWoowee! This is a beautiful make over, duncan phyfe tables are so classic. I longed for one many years ago, but could not find one so we found the table we have now. Thank you so much for linking up to Whimsy Home Wednesday!
ReplyDeleteThank you, it was a ton of work but so worth it in the end :)
DeleteFabulous restoration!
ReplyDeleteThank you Sandra, it did turn out very well after all the hours put in :)
DeleteLeeAnn - you do some amazing work! All I could think of was HOW MUCH WORK you invested into this table. I also learned about carbide scrapers which is something I previously didn't know about. Thanks for taking so many photos and for walking us through the transformation. It is amazing. Thank you also for sharing this post on the Home Imagined Link party.
ReplyDeleteThank you for such kind words Anna, it was a labor of love for sure. I am so glad to have informed you of something :) Thanks for hosting too!
DeleteWhat a wonderful job you've done. It is lots of work, but so very worth it, as you ended up with a gorgeous table. I need to get me that carbide scraper tool, it seems as a necessity when tackling these projects.
ReplyDeleteThank you. Yes it was allot of work that was well worth it. Those carbides are amazing for old finish removal.
DeleteMagnificent!! I recently found the game table version of your dining room table. I love it! It’s in pretty good condition. I don’t know if I want to attempt to refinish it. But, if I do decide to redo it I would most definitely us your technique.
ReplyDeleteI found my table at our local Church thrift shop for a mere $55.00.
Best of luck, the effort it took was totallly worth it for me, enjoy your great find!
DeleteHow old is the table? I have one very similar to yours. It has a butterfly leaf. Thanks!
ReplyDeleteI am not sure on exact age but old.. this one has that too. I love those fold away leaves. It is shown in a few of the photos above as well as the refinishing portion
DeleteThis is absolutely incredible! Beautiful job. Those legs are gorgeous. Visiting from the Wednesdays in the Studio linkup.
ReplyDeleteThank you, I am so pleased with the end result even though it was a ton of work
DeleteThe final product is AMAZING, wow, love it
ReplyDeleteThank you for linking to SSPS 368. See you again next week
Thank you for the kind words!!
Delete