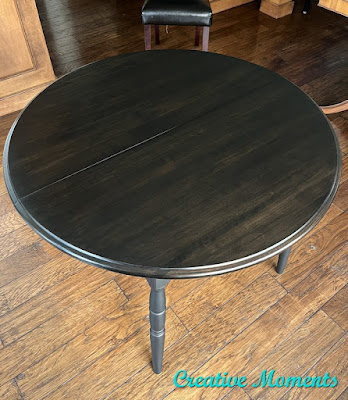
Black on black updates this solid wood dining table perfectly. The modern look gives this table new purpose in the home of my daughter and her family. Let me share how it was refinished.

This lovely solid wood table with 2 leaves was gifted to me from a fellow cleaning his family home out. I am always most appreciative when people think of me and the opportunity to give these pieces new life.
As always the first step is to clean well. All surfaces were scrubbed well and dried.
This video shows what I watch for to see if the stripper has lifted the finish
The stripper has done its work and now ready to scrape off the finish video
above is the table top
NOTE where it is not bubbled up the finish was still stuck so the process was repeated - apply stripper and allow to do its work, scrape again
above is one of the leaves getting stripped
Then the stripper needs to be neutralized using water and a brush. Scrubbing also removes any remaining finish too.

An easy way to remove the remaining bits of finish is to use a carbide scraper. This new fancy Hyde dust free carbide scraper actually attaches to a shop vac upping the refinishing game even more.
The sliding rails were very rusted. Here is my cleaning the rails video
The 0000 steel wool worked the best to clean all the rust away.


There were quite a few plastic table alignment pins snapped off so my handy husband drilled out the remaining plastic to fit new ones.
Then it was back to orbital sanding. See above left table leaves? the right one is mid sanding and the left one is after stripping and scrapping. The tops were sanded in 100/120/ 180 grits till buttery smooth. I switched to my Festool rotex sander with the detail attachment to do the table edges.
I LOVE wood grain and this table top is stunning and so worth the effort it table to get it back to bare wood.
The table top was flipped over on to soft padding and the apron edges sanded then painted a rich black color called anchor from the Dixie Belle silk mineral paint line. Here is a video of it going on.
A coat of black paint on the apron edges and the last one waiting to be painted.
The carved legs were partial power sanded on the flat areas then hand sanded with a sanding sponge on all the curved areas.
The legs were then painted and set in place to dry easily without touching any areas.
The solid black base is going to pop with the stained top.
My shop dog Harley keeps me company when I paint.
Using an Artist Brush I got in really close to any of the edges that were missed with the bigger brush. Two coats of black paint were applied to the base. The built in top coat makes it a one step paint perfect for table bases.
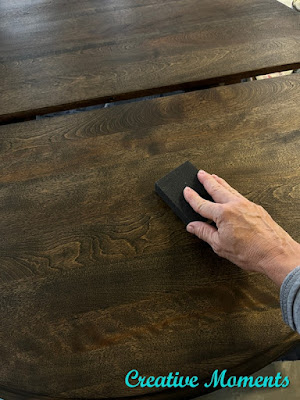
The top was flipped over and it and the leaves were hand sanded with a 220 grit sanding sponge then wiped well to remove all sanding dust.
Staining video - apply, let sit about 15 minutes and wipe off the excess with a shop towel.
This product is one step, no added top coats needed and SOOO durable.
It is a rich color that brings out the grain perfectly. After the first coat dries approximately 10 hours I lightly sand with a 220 grit sanding sponge.
Then another coat of SFO goes on and repeat as many coats till desired look. I applied 5 coats to this table.
Please keep scrolling down to see the chairs chosen to go with the table in their new home. It is my eldest daughter's home. <3
This color is hard to photograph so tried a few angles. The
SFO top allows a gorgeous wood grain to still show with the matte black base being solid.
The 2 leaves added make for many more guests around the table when needed.
After it was staged I applied a few coats of ebony stain to the inside edges of the table and leaves to keep a consistent stained finish.
This is a gift for my daughter and her fiance and below it is shown in their home with new modern chairs. What a gorgeous look right?
Please note the Amazon affiliate links are for your convenience to see the products I used. Ordering via the link may get me a small commission but does not affect your pricing.Thank you if you do choose to order them.
FEATURED ON
Dec 6,2024
Shared on these fun link up parties


You are so talented. I love this project!! Do I ever wish there was someone in Arkansas who does things like this or would teach me.
ReplyDeleteThank you. You are so very kind, I am sure there are furniture artists in your area that may be able to help. Thank you for being part of my tutorial teaching too. I appreciate you :)
DeleteVery Nice! What brand of sealer did you use on the black paint?
ReplyDeleteHi Candie, are you meaning on the table top? If so no extra sealer needed with the product shown. It is an all in one and amazing. My go to for table tops. Fusion Stain and Finishing Oil
DeleteAmazing process
ReplyDeleteAmazing job and
Amazing results
Kudos
THANK YOU!!
DeleteGreat post with helpful info on marble table top.
ReplyDeleteVery good tutorial, though I'm not a total fan of this black black black. More interesting might have been clear sealing the gorgeous wood grains on the top and the rest black. Still contemporary but with some relief.
ReplyDeleteThank you Sandi for your feedback. For sure the top could have been clear sealed for a two tone look but my daughter loves all shades of black. I had her compromise with me as I too love a good grain so stained the top black which allows the grain to still show thru paired with the solid black base. They love it this way and that makes my heart happy they have given this sweet table new purpose. :)
Delete