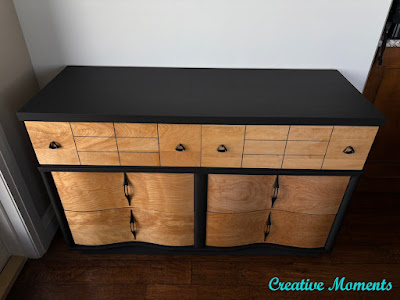
This stunning Mid-Century Modern dresser is a masterful blend of timeless design and contemporary refinement. Finished in a classic satin black, the body provides the perfect contrast to six elegantly curved, linear drawers, each showcasing a rich natural wood stain that highlights the beauty of the grain. At 50" L x 19" D x 32" H, this statement piece offers generous storage while making a bold, sophisticated impact in any room. A modern heirloom, reimagined for today’s interiors.
This Mid-Century Modern dresser was crafted by JW Kilgour & Bro in Quebec, Canada—a testament to quality Canadian craftsmanship. I'm always intrigued by the faux finishes these pieces were originally given, often masking the true beauty beneath. But beneath that dated exterior lies gorgeous wood, just waiting to be uncovered. Let’s bring it back to life and reveal the elegance that was always there.
Reviving this dresser was no small task—it took many detailed steps to bring it back to life. This tutorial will be a bit lengthy, but I believe in sharing both the challenges and the solutions so you can learn from the process and apply it to your own projects.
Water and a scrub brush neutralizes the stripper and removes the paint left in the grain, see the right side that has been scrubbed?
And then the scrubbed pieces are left to dry. Isn't this lovely wood grain hidden by the faux finish?
The flat surfaces on the front and along the edges were sanded smooth with my Festool orbital sander ETS REQ 125.
Quite a difference of after and before on the drawer front.
As usual there are areas that have had dings and gouges over the years of use that required some natural DAP wood pro applied with my super handy offset metal spatula. I use this spatula for so many things in my workshop.
It is always a challenge to clean up other peoples repairs. This is not a very tidy glue job on the dovetailed drawer repair.
A few of the drawer bottoms were completely loose (L), the small staples were removed with my all in 1 knife.


Again using my offset spatula, Titebond ultimate wood glue was pushed under the drawer slide and along the crack at the end. Clamps held in in 2 directions and left to dry well.
Again using my multi painters tool I carefully lifted the metal plates that were nailed to the drawer fronts as part of the hardware design. I am not going to put these back on.
You can see the original faux finish under the plate seeing it has not seen light to fade.
The drawer bottom I had glued before was not affixed in place using my Stanley electric stapler (mine is older than this version).
The dove tailed sides were glued on another drawer and left to dry. When both top drawers were dry, they too had EZ Strip paint & varnish stripper and were stripped and sanded like the curvy one previously.
Now on to the body of the dresser. It was given a good cleaning using the spray version of white lightning cleaner. Using a cloth it was wiped well then using clean water wiped again to remove all grim and cleanser.
There was a sticky label type thing (L) which was easily removed using my razor blade scraper (mine is really old but used often) (R)
The base was sanded on all sides to smooth the original finish. The solid wood round corners were sanded to bare wood using my orbital sander.
Laying on its back, it revealed one corner was significantly damaged.
Needing a super strong wood filler I chose the OG Bondo filler.
It was mixed and quickly spread in place and left to dry. It dries quick so move fast but this also allows you to move to sanding quickly too.
I love this sanding system as it is hooked to a dust extractor making a dustless system.
This repair is complete and gives a great durable spot to add a new glide later in the process.
It was not set up right and the top was sanded smooth again with the orbital sander.
The base was damp wiped to remove any remaining sanding dust.
One coat of BOSS on the dresser base.
A second coat of Bonding Boss was applied in 2 hours then left to dry 24 hours. I used a good synthetic brush to apply, I just made sure I cleaned it right after I was done using my favorite brush cleaner - Scrubby Soap
You can see the one drawer front done on left side of the photo and the before hand painting to the right. (R)
To get the edges of the paint line crisp, I ran my orbital sander over the front of the drawer again.
Two coats were done on the edges.
Holes were pre drilled to prevent wood from splitting and it makes tapping them in with a hammer so easy. These are such lovely additions for furniture making them easy to move on hardwood or carpet.
After each coat of primer and paint is dry, I like to smooth the surface with a 220 grit sanding sponge.
Two coats of paint were applied to the dresser base. I then set a few drawers in to see what color stain I wanted to choose.
Then put them all in again to get a better look at the dresser.
I am really loving the natural wood look with the classic black.
A couple more coats of natural stain finishing oil were applied with about 10 hours between coats. Again using the sanding sponge, they were lightly sanded after each dry coat.
Progress so far, now for the hardware.
The original pulls are so unique but the discolored gold finish just doesn't do them justice.
I like to spray outdoors. Do the back side first with a few light coats then flip and do the top side being sure to cover all areas.
LOVE the black hardware!
As did the buyer who purchased this beauty within 3 days of listing it.
This stunning classic black Mid Century Modern dresser with 6 curved and linear natural wood stained drawers is an updated modern piece of history. This beauty measures 50"L X 19"D X 32"H
For your convenience, I've included links to the Dixie Belle products I use. Please note that my affiliation with Dixie Belle doesn't increase your prices. Instead, your purchases through my links may provide a small subsidy that helps me continue creating and sharing these free tutorials. Thank you for your support!
FEATURED ON
Hometalk Dec 30, 2025
Shared on these fun link up parties


Your meticulous attention to detail really paid off. The transformation is stunning.
ReplyDeleteThank you kindly Sandra, I appreciate you stopping by with such kind words
DeleteYou did a fabulous job on this makeover. It always amazes me the beauty that lies under old finishes. Absolutely beautiful!
ReplyDeleteThak you so much Ann, I agree wholeheartedly!!
DeleteThank you for sharing with us, I'm featuring you when the next To Grandma's house we go link party starts!
ReplyDeleteThank you Tarahlynn, Merry Christmas to you and yours
DeleteBeautiful makeover for a classic but dated piece. This post will be a feature this week. #HomeMattersParty
ReplyDeleteThank you Donna, that is an honor, Happy New Year!
DeleteThis doesn't even look like the same piece! What a stunning transformation. Wow. I'm thoroughly impressed. Absolutely beautiful. Thank you for sharing this post with all of us at the Will Blog for Comments #75 linkup. Wishing you a wonderful week ahead--looking forward to seeing what you'll share at #76 which opens next Monday morning.
ReplyDeleteThank you Jennifer, I appreciate your kindness!
Delete