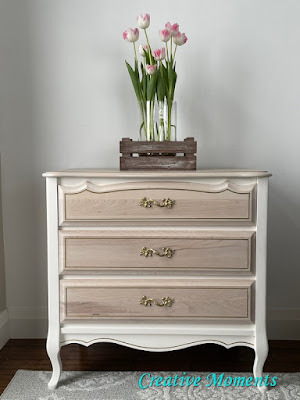
I LOVE French provincial bedroom furniture, the classic feminine style is just so elegant. I like to refinish in the classic traditional white but with this cutie I wanted to keep the fabulous wood grain on the top and drawer fronts and think the final look is perfect. Would you agree?
This sweet girl has seen allot of wear and has been painted over in a melamine type white paint in the past as well as had the hardware painted pink. Time to bring it back to life.
The paint peeled off quite easily and if needed my razor would lift stickier areas.
The top had all removed then moved on to the edges.
I applied a second coat and repeated. When done wipe with water to neutralize and let dry.
The top was power sanded to remove any residual paint. Just look at this wood grain. It would be a shame to cover right?

Again the effort was very much worth it.
On a balmy winter day here in Alberta Canada I hauled everything outside to power sand smooth.
Then the base was power sanded smooth.
And to be sure the paint sticks (unlike the previous paint job) to the factory paint I brushed on 2 coats of Dixie Belle Slick Stick and let dry overnight.
Links to the Dixie Belle products are for your convenience. My affiliation with this paint company does not increase prices on your end, your purchases via my links do however provide a small subsidy which allows me to keep providing these tutorials. Thank you!
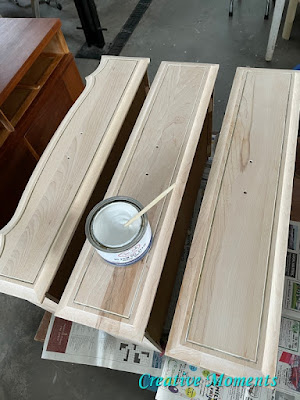
To keep the gorgeous grain but still have a bit of white I applied picklin white Dixie
Belle No Pain Gel Stain with a blue shop towel wiping back to leave just a faint white wash.
And repeated this process on the dresser top.
You can also see I applied a line of gold in the drawer fronts replicating the original look. The videos above shows how I did it.
I also applied the gold line around the top and dresser lower edge.
It adds such a fun surprise when the drawers are pulled out.
Now to address the painted pink hardware; EZ
Strip paint and varnish stripper was brushed on and let soak. Once it was activated the pulls were scrubbed with a brush and scouring pad to remove the old pink paint.
The original gold was worn in places but easily fixed with gold Dixie Belle Gilding Wax applied with a small brush and left to dry well. See the softer more solid gold finish of the painted bottom pull?
All new drawer guides were replaced as originals were all broken.
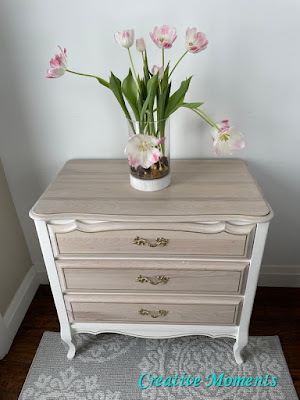
The final step was to add even more pretty fun to the drawers.
It was cut to size and ironed smooth.
Rather than decoupaging it in place I chose to use spray adhesive so it was removeable in the future.
Once sprayed and the back was tacky I smoothed it in place and the drawers were complete.
Another one of a kind feature was added to this beauty.
And it is ready for years more use.
gold details add glam
The drawer sides pull to reveal the pretty basket weave pattern. And yes Harley still loves to get in the photo shoot now and then.
I am sharing many of the photos repeated with the tulips as they opened, sooo pretty.
Links to the Dixie Belle products are for your convenience. My affiliation with this company does not increase prices on your end, your purchases via my links do however provide a small subsidy which allows me to keep providing these free tutorials. Thank you!
FEATURED ON
Hometalk
Shared up at these fun parties


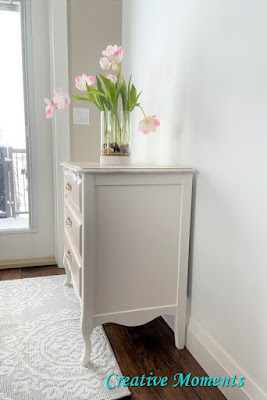


It turned out so pretty.
ReplyDeleteThank you so much :) your kindness is appreciated
DeleteThis is really beautiful! This is awesome. I would love it if you would share this on The Fabulous Friday Link Party, it's open now. You can find the link on my website, Peacock Ridge Farm. Blessings to you.
ReplyDeleteThank you I have shared it on your link up party, I would love to be featured, thanks
DeleteBeautiful and I like the pattern that you applied on each drawer. Thank you for sharing it! #HomeMattersParty
ReplyDeleteMel
Thank you Mel, appreciate the kind words :)
DeleteThis dresser came out so beautiful! I love it. It is so nice that you chose to show off the natural wood grains. Oh and the honey cone print on the sides of the draws are so cute. Wonderful job.
ReplyDeleteMeagan-Decorative Inspirations
Thank you Meagan, sorry for delay in reply as no notification arrived and just saw :)
DeleteLove it 🥰 It was worth all the effort and the hardware is to die for!
ReplyDeleteThank you Jayne for the kind words :)
Delete