FEATURED Blog Post on Hometalk

Favorite Combo Custom Painted Antique Dresser

  A valued customer entrusted me with restoring an antique dresser she found online. It was in much rougher shape than advertised when she picked it up, but I believe I transformed it to match her vision. With its classic warm white finish and a darker stained top, it now has the timeless charm she envisioned.

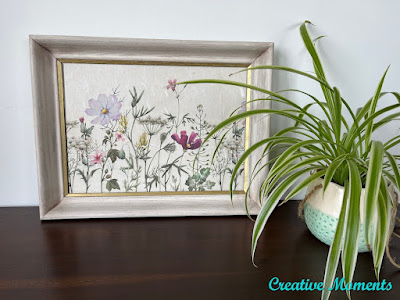
Spring Flowers Rice Paper Framed Art


Years ago I prepped an old thick solid wood frame. I cut a 1/2" piece of wood to fit the opening and painted them both white. Originally I planned to make a serving tray with this set up. However when I recently pulled it out of my to-do pile I changed my mind.

My vision saw the soft pretty spring flowers Dixie Belle rice decoupage paper featured as wall art.


The pieces laid out as I created the plan.


The rice decoupage paper almost fit perfectly with one sheet.


Dixie Belle flat clear coat was brushed on the plywood surface with a Dixie Belle premium chip brush. These 2 videos show you how I did it.


 The rice paper was pressed in place smoothing as I went.

 The paper is then topped with a layer of clear coat.


When all dry the paper edges were removed easily with a Dixie Belle sanding sponge.


Now a couple more coats of clear coat were brushed on allowing coats to dry between application.


To add an aged look to the frame, brown Dixie Belle's best dang wax was brushed on with a dedicated chip brush. I have one for each wax color.


When the plywood was set in the frame there was an edge of it that still showed raw wood. 


This was painted a couple coats of  saltwater Dixie Belle silk mineral paint with a Dixie Belle Artist Brush.


The inner edges of the frame were next. The wider edges was painted gold Dixie Belle Gilding Wax with a flat Dixie Belle Artist Brush. This gives a bit of sparkle and pop to the artwork.


But to make the flowers pop even more, the inner thin edge was painted coffee bean Dixie Belle Paint with a small Artist Brush. This rich chocolate brown kind of outlines the flowers.


The last step is to glue the plywood to the frame.


Flip it over and add heavy weights to allow all to dry flat and even.


I think it looks really sweet.


Subscribe to these Blog Tutorials ~ Visit my Etsy Store
Follow me on Facebook Follow me on Pinterest 
Follow me on Instagram ~ Follow me on Hometalk


Here is a video tour of this sweet spring flower art piece.


Links to the Dixie Belle products are for your convenience. My affiliation with this company does not increase prices on your end, your purchases via my links do however provide a small subsidy which allows me to keep providing these free tutorials. Thank you!

FEATURED ON

Shared on these fun link up parties

Comments

  1. Absolutely stunning, love it. Thank you for sharing your links with us at #283 SSPS Linky. See you again next week.

    ReplyDelete
  2. Hi Lee Ann - I love how this project turned out! The flowers are so beautiful! Thank you for sharing your post with the Home Imagined Link party.

    ReplyDelete
  3. Oh wow, so special and pretty. Thank you for sharing your links with us at #286 SSPS Linky. See you again next week.

    ReplyDelete

Post a Comment