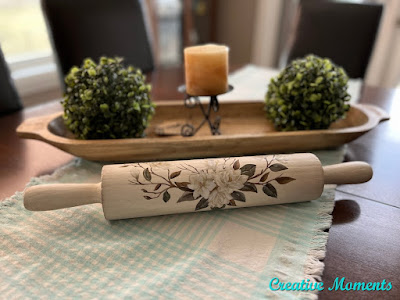
This old hand turned solid wood rolling pin sat for years in my stock to paint stash. Prepping for my annual vintage market had me going thru the box. I saw it and visualized it painted warm white with my favorite magnolia flowers on it. So that is just what I did.
After a deep scrub with
Dixie
Belle white lightning cleaner to get rid of years of oil and use it was dried well. Using my Festool orbital sander it was sanded fully to smooth the surface back to bare wood.
It hung perfectly with a cup hook in the original hand turned hole from my husbands car lift.
To be sure the paint adhered well to the wood surface it was painted grey
Dixie Belle BOSS. This product blocks stains, smells and primes the surface. Two coats were brushed on and left to dry 24 hours.
My favorite warm white, endless shore
Dixie Belle silk mineral paint was the color of choice. This all in one paint covers so well, see the grey BOSS on handle and one coat painted on?
Two coats were brushed on and allowed to dry well. You want the paint very dry before applying transfers.
Now to apply my favorite magnolia Dixie Belle transfers. Cut design, remove backing and press in place, burnish with the stick included and remove the top sheet.
I was working on this rolling pin along with this pretty cake plate as a matching set.
I do like the sheen of wax so a coat of clear
best dang wax was rubbed on the whole rolling pin.
It sold first thing at the market.
Links to the Dixie Belle products are for your convenience. My affiliation with this company does not increase prices on your end, your purchases via my links do however provide a small subsidy which allows me to keep providing these free tutorials. Thank you!
FEATURED ON
Hometalk
Feb 15, 2024
Shared on these fun link up parties


Beautifully done, It will be awesome to have this in a cookie cutter form to press dough with that awesome design.
ReplyDeleteI visited you via Create, Bake, Grow & Gather Party #596
I linked up this week with = Puff Pastry Milk Cake and Tim-Tam and Chocolate Cheesecake Ice Cream (No Churn!)
Hope you will join us M-S SeniorSalonPitStop and W-S #WordlessWednesday. You will find both under BLOGGING
I love how you transformed this simple rolling pin! It looks beautiful. Thank you for sharing your post with the Home Imagined Link Party.
ReplyDeleteThank you for the kind words
DeleteVisiting from Esme Senior Salon InLinkz 296 - nice job on the rolling pin 👏
ReplyDeleteThank you!!
DeleteLee Ann's Creative Moments is a haven for transforming forgotten furniture and decor into stunning, custom pieces. Her latest blog post showcases the resurrection of a neglected hand-turned rolling pin, now adorned with charming magnolia flowers atop a warm white finish. It's a testament to her vision and skill in breathing new life into old treasures. Don't miss out on more inspiring transformations by subscribing today! More info....Furniture
ReplyDeleteWhat a beautiful display piece! I love antique kitchen tools, and you have given this old rolling pin new life!
ReplyDeleteThank you Leslie, I appreciate your kind words
DeleteSo pretty! Featuring you at Wednesdays in the Studio!
ReplyDeleteThank you, I appreciate your feature
Delete