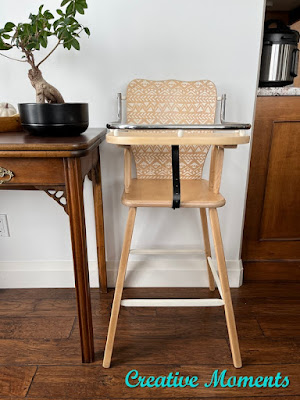
I love giving old pieces new life. This vintage wooden high chair was my latest makeover project. I am loving the end look, how about you?
This solid wood cutie was found by my furniture scouting sister. I messaged the seller sight unseen I would take it. My Mom picked it up and delivered to my door. THANKS family for all your help!
First step was to disassemble it all.
And hope I would remember the way it all goes back together. Taking right apart allows better access to all the parts.
I marked each set of screws to be sure they went back in original holes. The bottom pair had to have new replacements. They were the main screws that the tray flipped with and bent over years of use.
Then it got a good deep scrub with white lightning cleaner mixed in a bucket. I use a scrub brush to get in all the nooks and scrub the flat surfaces too. A clear water rinse washes all the past grunge away.
The legs were easily removed. There seems to has been glue repairs in the past that now wet was scraped off.
All the scrubbed pieces drying.
Once good and dry it was time to sand off the old finish. Using my handy Festool rotex 90 I sanded every surface. The old chair back design took allot of passes and still remained a ghost image.
Doing the edges while clamped in a workbench really helped.
Sanding grits 80-120-180 were used on all these pieces.
The head was switched to the detailing mouse to get in the tight spots.
Now to address the ghost image
Original thought was the nursery Dixie Belle rice decoupage paper. I laid out 2 of the scenes and let my followers pick their favorite. It was pretty close but the bear was the top vote. Would you agree?
This give better idea what it would look like in place. I decided against it wanting to keep a soft natural wood vibe.
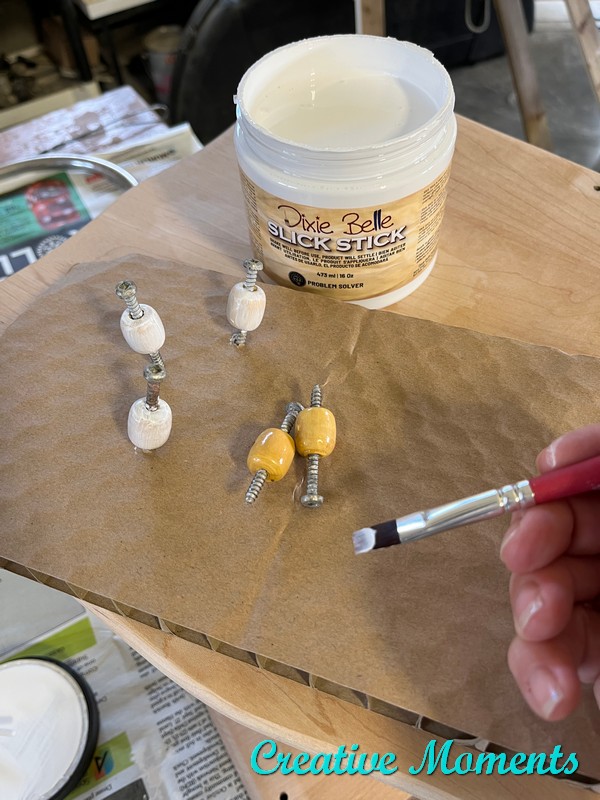
These are the original tray beads. Grungy and well worn. Time for new ones.
Low and behold I happened to have some in my bead kit. This is why I have kept all my craft supplies for years on end :)
All surfaces were then hand sanded with a 220 grit sanding sponge. The one leg brace had a past break that needed repairing. It was glued and clamped and left to dry.
I decided to cover the ghost design with a pretty Dixie Belle stencil. Again the poll was given to my followers.
They chose my favorite choice. The mudcloth stencil.
It is perfect. Once dry the design was lightly sanded with a sanding sponge to smooth the paint and give a worn look.
Setting the back in place for a sneak peek - such a fun design for kids.
The new beads were painted 2 coats of Slick Stick and left to dry well. This product makes sure the paint will stick like glue to these super smooth beads. After a couple days they were painted two coats of the endless shore silk mineral paint.
The warm white silk paint was brushed on the base cross bars.
The seat was glued firmly in place.
The original screws were given a fresh coat of silver spray paint.
The back was screwed in place followed by the tray which was all back together with new beads and chrome arms.
It is so adorable. And it sold even before completed.
The tray flips back making the perfect booster seat too.
Links to the Dixie Belle products are for your convenience. My affiliation with this company does not increase prices on your end, your purchases via my links do however provide a small subsidy which allows me to keep providing these free tutorials. Thank you!
FEATURED ON
Hometalk Dec 4, 2023
Hometalk April 16, 2024
Shared on these fun link up parties


I love it, but what about seat belts for safety?
ReplyDeleteYes it seems the vintage era did not worry about a seat belt per say but they did have the strap to lock the tray down :) I think you could sure a soft scarf as a safety strap if needed
Deletewell done!!
ReplyDeleteHow fun is this?! It turned out beautifully. Thank you for sharing it with us on Farmhouse Friday 328. Featuring it tomorrow! Hope you link up again soon. pinned
ReplyDeleteThank you for featuring this cutie
DeleteSweet indeed love use of stenciling !!
ReplyDeleteThank you :)
Delete