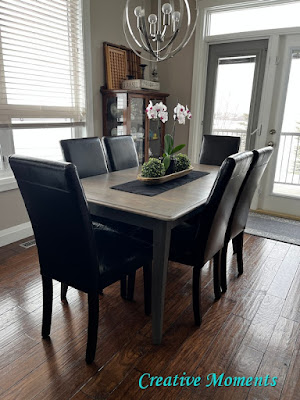
This solid wood dining table underwent a HUGE change up. It went from covered in glitter and craft paint to a gorgeous Restoration Hardware inspired weathered grey finish.
This well loved table was listed for free on a local buy and sell site. I totally saw the potential it had, even covered in all the craft paints and glitter. Would you take it on?
This tutorial is a long one. Lots of details to revive this beauty. Please be sure to get to the end to see the results of all these steps.
I started with the leaf trying out a new Festool sander. The above right photo was with 80 grit sandpaper but it was slow going.
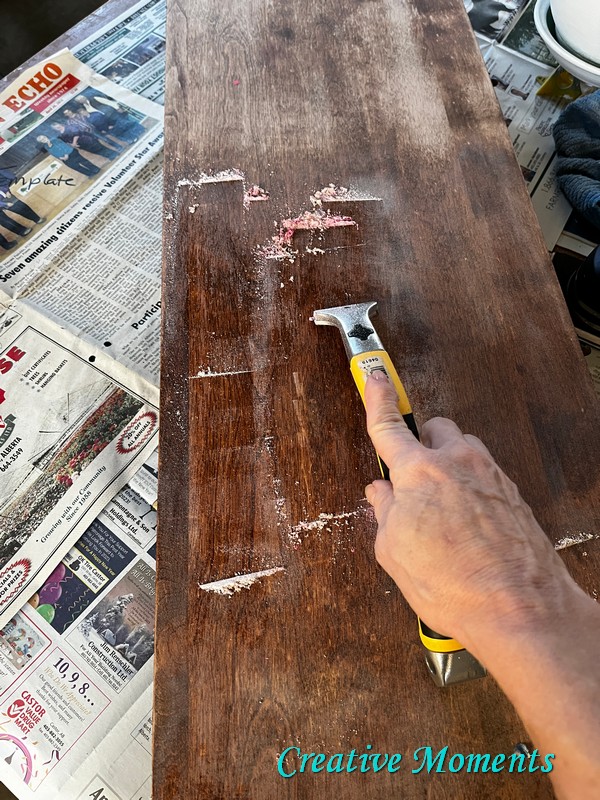
I decided to help the proces
s along using my carbide
scraper from Richard tools. Once I scraped off allot of the gunk, glitter and old finish (L), I wiped it ready for the next steps. (R)
The table top before above
My next attempt to remove the factory finish was with
EZ
Strip paint and varnish stripper. It was brushed on, left to sit for about 15 minutes then scraped off with a metal spatula.
I neutralized the stripper scrubbing with water then drying with a towel. Still the finish remains.
Then it was back to the
carbide scraper. This time I had better luck getting the finish off.
I finally could power sand the table surface to the bare wood.
The legs were scrubbed with
Dixie
Belle white lightning cleaner in warm water with a scrub brush. After being rinsed with clean water they were dried with a towel and left overnight.
I pondered sanding the legs to bare wood.
and one end of the table apron thinking of doing the entire table in a clear coat.
It is a very trending look but getting chairs to match will be a challenge for customers.
Th original stain color is quite dark and in pretty good condition so I decided to leave it, All the legs were scuff sanded with
Dixie
Belle sanding sponge.
and table apron edges were scuff sanded as well. The sanding dust was wiped off all.
The bare sanded edge and leg were clear coated to be sure the paint absorbed the same on all surfaces.
After each coat of paint I like to lightly sand with a
sanding sponge to keep a smooth surface. Two coats of paint were applied in total.
This large
brush makes the job fast and easy!
Buffing with a sock ... again super fast and easy.
To add a bit more dimension to the linear table I brushed on black
best dang wax to the edges and creases.
Legs waiting to be put back on.
The top has now dried for about 4 days so all is ready to reassemble.
When I hauled the top inside my home to stage and set it on its side I was able to remove just a few wee areas were the paint may have gotten un the table underside with my carbide scraper. This keeps it looking neat, tidy and professional.
From this view I also saw scratches on the underside table edges so fixed them applying
Big Mama’s Butta. This video shows just how amazing it works.
Finally there was a whole bottom edge that was missed on paint so it was painted the 2 coats and sealed and the table was complete.
The legs were put on, flipped right side up and this beauty is ready to serve.
I really like the weathered grey stained top. It does feel Pottery Barn or Restoration Hardware inspired successfully.
And the painted base will pair well with many color chairs.
take a video tour below
full size with leaf in
Links to the Dixie Belle products are for your convenience. My affiliation with this company does not increase prices on your end, your purchases via my links do however provide a small subsidy which allows me to keep providing these free tutorials. Thank you!
FEATURED ON
Shared up at these fun parties


Thank you for sharing at SSPS 258 and thanks for the mention in your post Tweeted.
ReplyDeleteCheers for hosting :)
DeleteLeeAnn you are a brave woman! I probably would have never taken this on. In fact I have a table waiting for me to redo. It is a lot of work. Your table came out great!! Hurricane gray is such a pretty gray.
ReplyDeleteThank you Cheryl, Many don't do tables but I love doing them. Although many times part way thru I am like why!! LOL But the end result always makes it worth it to see them have new life
DeleteLove it- what a job but you stuck with it and is a beauty!
ReplyDeleteThank you so very much :)
DeleteStunning LeeAnn! One would never know they were the same table, love it! I would like to say yes, I would like to try a project like this, but I am doubtful I would actually do it or end up with the same results, lol! Have you ever tried oven cleaner on wood? I have seen it, but never tried it. I think I would be too afraid to try it. Thank you for sharing!
ReplyDeleteThank you :) I have not tried it for a couple reasons, the first is it seems so unenviromental to me to spray can of oven cleaner on wood esp after they have created better safer stripper and 2 it seems to leave the wood very dry. I have gotten the feedback from fellow restorers who concur but there are lots who seem to like it. I will never say never but highly doubt I will ever try that trend :)
DeleteLeeAnn - I can hardly believe that is the same table! You put SO MUCH WORK into the transformation and it really turned out beautifully. Thank you for sharing this post on the Home Imagined Link Party.
ReplyDeleteThank you kindly Anna, I really love seeing them reloved and ready for many more years of service :)
DeleteThank you for your comment on the oven cleaner, I did not know about it drying out the wood, and yes, chemicals are bad. Something I did not think about when I kept seeing it pop up. Maybe one of these days I will dip my toes into restoring a furniture piece. I only have one under my belt, and it was enough for me to rethink any more pieces lol!
ReplyDeleteRefinishing is a bit of a learning curve and for sure understand your hesitancy to try again. But for most I say try a smaller project and go from there :)
Delete