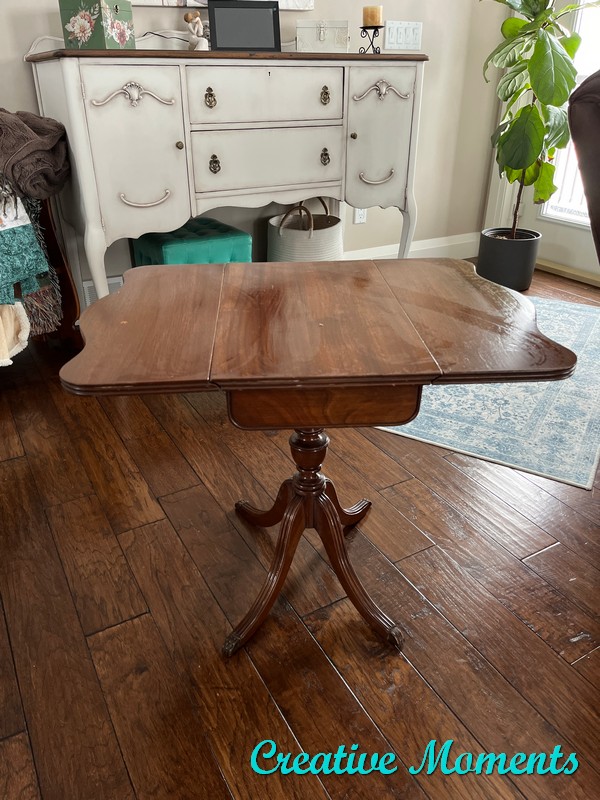
This stunning antique drop leaf table is both functional and full of charm, the fold-down edges that make it ideal for smaller spaces while providing extra surface area when needed. Measuring 30”W x 22”D x 24”H, it’s the perfect versatile piece. The top has been beautifully refinished in a rich walnut stain, complemented by a warm white milk-painted base. Light distressing and dark wax enhance its vintage appeal, preserving its timeless character. A lined drawer, finished with elegant damask paper, adds a lovely touch of detail and practicality.
Let me share how I achieved this updated look.
I scored this beauty at our local Salvation Army thrift store along with a variety of other goods.
But I did not notice when I bought it that one leg was broken off and nailed back in place. Nor did I notice it had 2 of the brass toe caps missing. Luckily I found and ordered 2 replacements from a place in the USA.
This broken leg took a pile of work to repair. I am sharing many photos of this process but you can scroll further down to skip it if too much detail.
My handy husband helped me carefully remove the nail and the broken leg that was glued as well. You can see another nail in the left photo we had to remove. Now to address the snapped off dowels. (R)
Using a large drill bit, my husband worked carefully to remove the dowel pieces from the table's main center post.
As well as from the leg itself. He has it secured in the workbench to keep steady as he drilled the leg holes out as well.
With the post holes tidied up, another part of the post that was glued was taken off and both sides cleaned of old glue and any debris.
Using Titebond ultimate wood glue, a loose piece was pried up a bit and a thin spatula was used to get it down in the crack. Then, more glue was added to the other side where the large piece was removed.
All glued pieces were clamped in place and left to dry well.
I tidied up the holes again with the large drill bit.
Using the wood glue again it was time to affix the leg securely in place. Both the post holes and the new dowels that were in the leg pieces had glue applied.
Then they were pushed gently in place, the excess glue wiped away then set to dry. The levelness of the table was checked to be sure the table will not wobble and be level. The table was once again left for days to dry well.
Whew, that was allot of steps that had I not had to repair the broken leg would be skipped and the relove would start here.
The top of the table was a lovely wood grain that needed a refinish.
Apply the stripper in a thicker layer and brush level then allow to do its work.
When the finish lifts, I scraped it off with my metal putty scraper and put it in an empty popcorn container. The surface was then scrubbed with clean water and a scrub brush to neutralize the stripper. The brush also removes and bits left in the wood fibers.
Allow the piece to dry very well.
The wood was then sanded smooth with my Festool orbital sander with grits 120/150. The stripped and sanded top looks fabulous.
DAP wood pro was pushed in the small cracks between the center post and leg edges. Wipe excess with a damp cloth to give a smooth continuous surface. Allow to dry.
It was time to paint the base. I chose Milk Paint by Fusion in the color london fog. This is the first coat that always looks sketchy.
If you are interested in ordering milk paint and the stain finishing oil directly from Fusion Mineral Paint this affiliate link will get your 10% your entire order.
After each coat of milk paint is dry, I sand it smooth with a thinner flexible sponge to a soft buttery smooth surface (L). The edges were also distressed to keep the antique vibe. (R)
Another 2 coats of the warm white Milk Paint and it is perfect for this piece. Above is both ends shown.
Back to the top, the fold down edges were hand sanded with this handy Sander Card. It is the perfect way to get into tight areas.
The sanding dust was damp wiped away. This also shows what the wood will look like when stained. Allow to dry.
After the top was complete I folded down the edges to get them stained up too. I am loving this new color.
To add a bit more age and authenticity I added antiquing Fusion furniture wax in all the nooks and crannies with and artist brush.
These closer up pictures show the milk paint with clear and dark wax after light distressing. The table looks to have been painted years ago.
The drawer, sides and scalloped edges were up next.
I brought the table inside to continue more Fusion stain and finishing oil coats as we were in a deep cold spell. Three more walnut coats were applied. I find nice thin coats work best and let each one dry 24 hours.
The brass toe caps - 2 of which I had to source from the USA were scrubbed well then given some shine with gold Gilding Wax. See dull one on the left and gilded one on the right?
And one last added touch was to add a pretty drawer liner. I chose distressed damask rice decoupage paper. It was cut to size then affixed in place with a spray adhesive. This allows it to be easily changed out if the owner wants something different.
This is the gorgeous table top walnut wood grain.
take a video tour of this beauty

I've included Fusion Mineral Paint affiliate links for your convenience, making it simple to locate the products I utilized. Plus, by using these links, you'll save 10% on your entire order! Please note that I may receive a small commission from your purchase, but this comes at no extra cost to you and enables me to keep providing these free tutorials. I appreciate your support should you decide to make a purchase through my links.
Please note the Amazon affiliate links are for your convenience to see the products I used as well. Ordering via the link may get me a small commission but does not affect your pricing. Thank you if you do choose to order them.
FEATURED ON
Hometalk newsletter April 28 2025
Shared on these fun link up parties


Thanks for sharing with us, I'll be featuring you this week when the next To Grandma's house we go link party starts!
ReplyDeleteThank you so much for the feature, I am honored :)
DeleteOnly you and your readers will know the love and care that went into fixing the broken leg. With your patience and knowledge the little table will stand the test of time AGAIN in a prominent place in someone's house. Great work!
ReplyDeleteThank you, that is very true and I appreciate my readers along for the journey :)
DeleteHow gorgeous and precious! You have a versatile GEM that looks awesome! Your husband's skills and tools made it restored perfectly 👏
ReplyDeleteThank you for your kind words, they are very much appreciated :)
Delete