I always hate to waste or throw things out even if going to be recycled like these glass jars so I am always thinking about ways to give things new life. The shapes of these glass jars were the perfect backdrop for extra pieces of rice decoupage paper I have on hand. I wanted to see how they paired together and very much enjoyed the end result. The pairings are endless with all the glass jars and vases I have as well as loads of pretty rice decoupage paper I have stocked.
Be sure your jars are super clean, I run mine thru the dishwasher as an easy way.
I totally missed taken photos of all the clean jars having 2 coats of Slick Stick applied and left to dry for 24 hours. This gives a nice back ground of crisp white for the paper as well as assuring everything sticks to the glass surface.
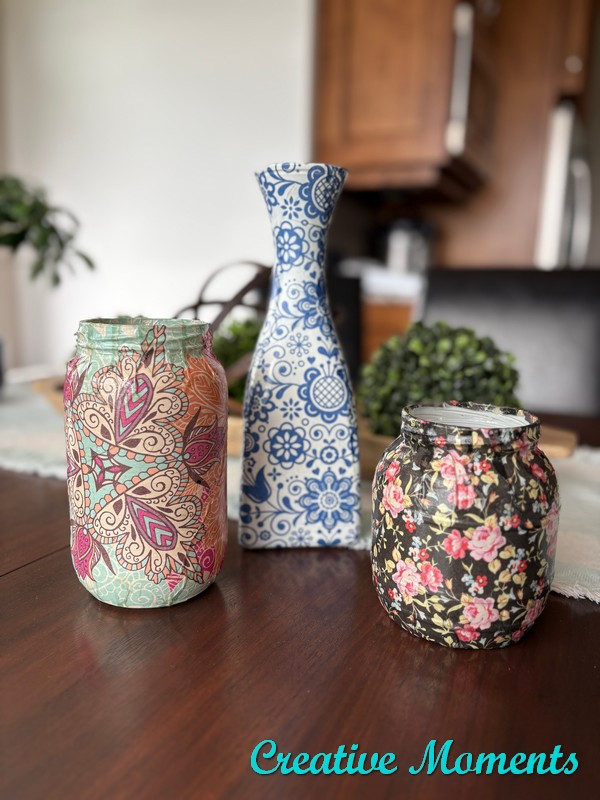
This paper is blue glass ornate pattern
Glossy clear coat is the product used to apply and adhere the decoupage paper. (You can use pretty napkins as well) Brush it on and place paper where you want it smoothing as you go. Due to the curves, I chose to just do the square bottom area first, meaning just apply the "glue" where you want it. Working upside down made it easier too. Once the paper is where you want it, clear coat is applied on top of the paper to saturate it creating the decoupage finish.
I did the same steps on the other 2 jars doing the larger flat surfaces first. Native rose is the paper going on the jar on my hand.
This is the retired peony pattern paper, so pretty!
Then using your sharp scissors, cut towards the curves. This allows the paper to move and bend easier in smaller pieces as well as overlap if needed.
Apply the clear coat (this time I used a synthetic chip brush) to the glass parts, smooth paper and add the outer layer of clear coat. Smooth with your finger and let dry well. When all dry I added another coat of the glossy clear coat for a lovely shiny finish.
UPDATE- The clear gloss turned yellow on this pretty white paper so will try another sheen on the next white background project.
They turned out really pretty. Great for pens, pencils, utensils, dry flowers and fresh but I would not recommend washing the outside.
Or they just can be pretty decor.
This is just the beginning, so many combinations are out there to be created.
Links to the Dixie Belle products are for your convenience. My affiliation with this company does not increase prices on your end, your purchases via my links do however provide a small subsidy which allows me to keep providing these free tutorials. Thank you! Please note the Amazon affiliate links are for your convenience to see the products I used as well. Ordering via the link may get me a small commission but does not affect your pricing. Thank you if you do choose to order them.
FEATURED ON
Shared on these fun link up parties


Those are so pretty!
ReplyDeleteThank you Joanne for your kind words :)
DeleteOh how pretty! Those glass jars are the perfect shape for little glass vases! You sure managed to get that paper shaped to perfection too! Wow!
ReplyDeleteThank you Donna, I appreciate your kind words and featuring us on your fun link up party, cheers!
Delete