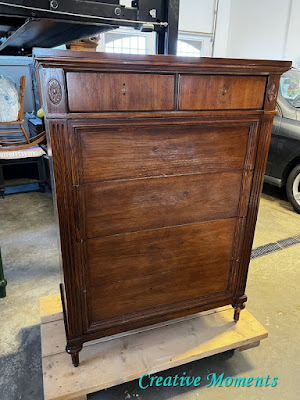
There is something about a classic warm white dresser that gives it a timeless appeal don't you think? When I purchased this ornate dresser I immediately envisioned it in this color.
This was the seller's photo of it in her sea can. I saw great potential even with the drawers out of order :)
As per usual the first step after removing the hardware was a good cleaning. I like to use
Dixie
Belle white lightning cleaner in a bucket of warm water. Using a rag it was scrubbed then rinsed with clean water. Inside and out, front and back and top and bottom all get cleaned well.
Drawer repairs were up next. A couple had very bent runners that were bent back in place and reaffixed in place.
The insides were power sanded to freshen up.
Everything was given a slight scuff sand and wiped clean again. Now everything is all ready to go.
I don't usually paint with the drawers in but did do the first coat with them in to try it. I chose endless shore from the
Dixie Belle silk mineral paint line.
Pull the drawers open with a chopstick and paint the edges and above right is the first coat left to dry.
The reason I like to paint with drawers out is you need to remove them anyway to do the inside edges. I also paint the upper & undersides of any edges going across.
Once the paint is dry I use a
Dixie
Belle sanding sponge to gently smooth the paint surface and give a silky feel. This is done after every coat of paint.
Coat number 2 - the thing about white that many don't know is it takes more coats usually then other colors to get a nice coverage. I will need another coat for sure once this dries.
A third coat was applied the next day.
While the paint dries I work on the hardware. It was scrubbed well a few days ago and now dry ready to update.
I chose between 2 colors of Rub 'n Buff; left gold leaf and right antique gold.
The gold leaf won so all pieces were brushed with this pretty gold.
When dry they were buffed and put on on the drawers, so pretty.
I added the same gold leaf on the dresser medallions
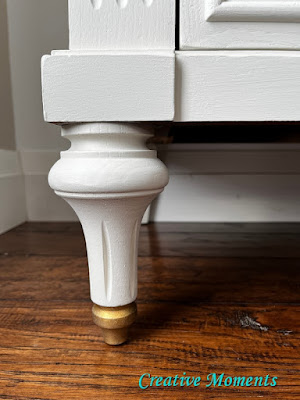
and the toes of the curvy front feet. This area worked best with my finger to apply.
The medallions look quite regal now.
It is done awaiting my husband to help me carry the beast into the house to stage.
Once it was inside and the lighting is much brighter I saw areas needing a quick touch up. The
Dixie Belle Artist
Brushes are perfect for this job.
Those legs are just so pretty.
And NOW she is complete!
They are SOLD!!
Links to the Dixie Belle products are for your convenience. My affiliation with this company does not increase prices on your end, your purchases via my links do however provide a small subsidy which allows me to keep providing these free tutorials. Thank you!
FEATURED ON
Hometalk April 10, 2023
Shared up at these fun parties


It looked even more elegant in real! Nice job.
ReplyDeleteThat is very kind, thank you :)
DeleteThis is very elegant. I love it. The design & color theme will blend with any decor. Just lovely. Thank you for posting.
ReplyDeleteThank you I agree, very timeless look to last for many more years
Deletefantastic,very beautiful
ReplyDeleteThank you so much :)
Delete