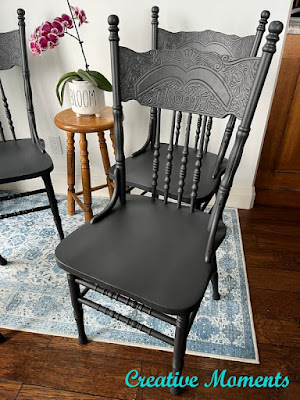
I adore pressed back dining chairs; they brim with character and charm. This set of four was refreshed in classic black, making it a timeless update that suits any home style.

As always I scrub my pieces well to remove any dirt, dust grime and oils from years of use. I dilute white lightning cleaner in a bucket of warm water with a bit of dawn, use a scrub brush to get into all the nooks and crannies and rinse and dry well
Repair were addressed next with wood filler. These chairs had some spindles chewed on by a puppy most likely. I use my finger to apply on rounded surfaces as it gets in easier.
gluing the chair back video
more sprayer videos
The chairs were turned and spraying continued
I used the Bonding Boss that was left in the sprayer tub to touch up areas on the chairs. No waste of product here.
All 4 chairs primer sprayed and left to dry well.
A few days later the chairs were positioned like this to start the painting spray. I like to start with chairs upside down to get the underside areas done first.
Caviar Dixie Belle Paint was mixed with some water and added to the sprayer and sprayed on.
Paint spray video
The chairs were turned yet again to spray from the front side now.
Many light applications in various positions were done to cover all the chair surfaces well.
And once again the remaining paint in the spray tub was used to hand paint any areas missed with a small flat synthetic brush. The chairs were left to dry overnight.
The final step was to spray multiple coats of satin clear coat which was watered down as well according to the viscosity tester. The chairs were rotated in all directions once again to get all areas.
A pair of solid wood dining chairs (tutorial coming soon) were done in all the same steps at the same time.
These chairs are now ready to get back to work in their new home.
It did not take long and they were scooped up by a lady along with the matching pair to add to her recently renovated dining room. She matched them to a natural stained dining table- a very popular current trend.
Links to the Dixie Belle products are for your convenience. My affiliation with this company does not increase prices on your end, your purchases via my links do however provide a small subsidy which allows me to keep providing these free tutorials. Thank you!
FEATURED ON
Shared on these fun link up parties


GORGEOUS!!!!!
ReplyDeletexo Lisa S
Thank you very much :)
Delete