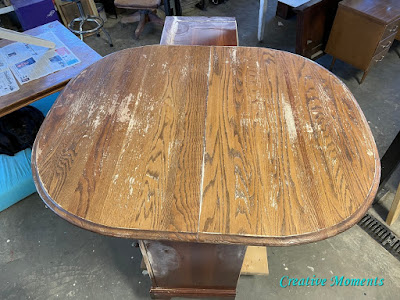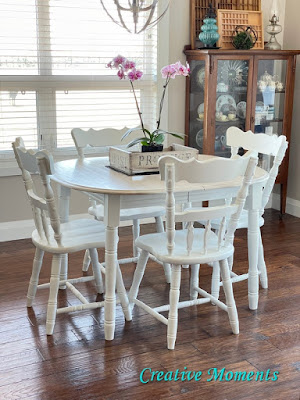
Check out how this vintage solid wood dining set was made over to become this beautiful fresh white modern farmhouse update above from this dated dark stained finish below.
The 6 chairs and dining table with 2 leaves was the customers parents bought back in 1983 (stamps on chair bottoms confirm) that was passed down to them. After 10 years in their home they wanted a fresh new look. They wavered on colors for the top thinking black or grey but were pretty sure they wanted a white base and chairs.
I always suggest to go with classic colors you wont tire of and will like years from now.
They dropped off the dining set and you can see the table top has seen allot of wear over the years.
As have the chairs. One even looked as though it may have been left outside as almost all the finish was chipping off.
This is a big project so I will be sharing allot of photos helping to document the makeover. The customers had hauled everything outside and gave it a deep clean prior to dropping off. This is a very important step as dining sets see lots of food, grease, fingermarks etc that need to be removed in order to get a good paint adherence. When I clean my wood furniture pieces I like to add Dixie
Belle white lightening cleaner to warm soapy water, scrub well inside and out with a scrub brush then rinse well and dry.
The table top was hauled outside to power sand off the chippy old finish.
Here is the progress after an hour.
I took a break from the top and moved on to the chairs. All the chair feet and table legs needed to be sanded to bare wood from very chippy finish, I would guess water damage somewhere over the years.
Most of the chair backs needed sanding smooth on both sides and both back pieces. Some needed Dixie Belle mud added to some cracks then sanded smooth when dry.
There were 6 missing wood plugs, luckily I have some on hand to glue in and replace.
The one chair in really bad finish condition was basically sanded to bare wood everywhere. To get the areas between the spindles I used my trusty carbide
scraper from Richard tools.
Wow, right?
Back to the table top with a finer grit paper I finished it all up including the edges. This is why I always say investing in solid wood is worth it. Almost 40 years later it can be sanded to the wood and refinished in a new look.
Starting with the chairs, they were all wiped down well with a damp cloth to remove sanding dust.
Primer was brushed on to seal the bare wood spots and give all surfaces a consistent finish. Dixie
Belle BOSS in white would be the perfect product for this step. I have it on my order list.
Even though I thought I sanded all drip marks from the original finish, you will see them enhanced with paint as you can see above.
I like to start painting my chairs upside down to get all the underside areas that tend to get missed if just painting in the upright position. Once flipped up you can finish the prep coat with ease.
This step seals all the sanded back wood helping to prevent bleed thru however it is not uncommon for white painted projects to have these wood tannins leech thru over the years. It is just what happens with previously stained woods and varieties of wood.
All 6 chairs are complete and left to dry.
Now on to the table legs and apron
Then it was a repeat of all the surfaces with the first coat of paint; a crisp white called whitecap from the new silk paint line from Dixie Belle paint. This new formula has added stain blocker and built in top coat making it an all in one paint. I brushed it on using Dixie Belle's oval brush.
Even with the built in primer, after the first coat there were many places where the wood was sanded bare that had tannins leeching. I added clear Dixie
Belle BOSS to these areas.
This is a hazard of wood and whites. I had to do a few coats of boss and other areas as they popped up. It is the moisture in the paint that draws the tannins to the surface.

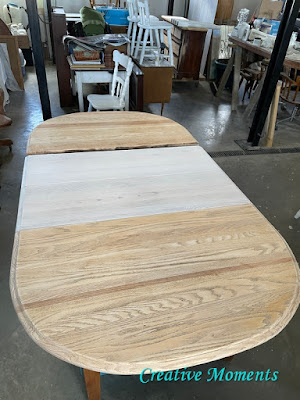
Then it was on to sanding the 2 leaves on another nice day outside.
I love solid wood.
The table top was wiped to remove all sanding dust ready to stain. The couple originally wanted the top stained black but after seeing the sanding dusted top they waivered.
I showed them the painted white cap base next to it. They were leaning towards a natural stained top but seeing this they went with a white washed top. Yeah I love that decision.
I like to mist the wood, apply the stain and brush with the grain. More mist makes for a lighter stain. You can also wipe with a blue shop towel if too white.
Doing the laves first allowed for me to show 2 different amounts of white stain. See the farthest one is more white? Which would be your choice?
I showed them with the chairs in background.
I preferred the left one; lighter so started sanding by hand with a Dixie
Belle sanding sponge to get the right one to be the same consistency now that it was drying. This stain dries fast so always move fast when using it or you get to sand :)
I went ahead and stained the table top to match the lighter leaf.
Then propped the legs up to my work table and set a couple chairs next to it to send picture to customers.
They wanted more white so another coat of white magic was applied all over just like above.
Here is the final look getting 2 thumbs up.
I also planned to use the Dixie
Belle Gator Hide over the base pieces as well so started with the table legs. It was quickly evident that the moisture in the clear coat was drawing more tannins. See them yellowing the crisp white paint?
Good thing I noticed after 2 legs. I repeated the fix of Boss to the legs and repainted them a fresh coat of silk white cap. The painted base will not be getting this step anymore.
Back to finishing the top; for coats 2, 3 and 4 I added some white magic to the Dixie
Belle Gator Hide to add just a bit more white to the top. Coats 5 and 6 were done regular clear. Between each coat once dry and before applying the next I lightly sanded the surface with a sanding sponge.
And this beautiful modern farmhouse update is complete.
Enjoy scrolling thru all the dining set photos below. I tried to capture all angles to give a better visual. There is a video tour as well.
dining set video tour
Links to Dixie Belle products are for your convenience. My affiliation with this fantastic paint company does not increase prices on your end, your purchases via my links does however provide a small subsidy which allows me to keep providing these tutorials. Thank you!
FEATURED
Shared at these great link up parties


So Cute! Great job as always.
ReplyDeleteTHANK YOU! Your support and kind words always mean allot.
DeleteCongratulations, your table was most clicked at the Friday with Friends link party.
ReplyDeleteYou have so much knowledge to share on rehabbing old furniture. Thank you for sharing your tutorial with us!
Oh my goodness, that warms my heart, thank you so much for letting me know this and for hosting :)
Delete