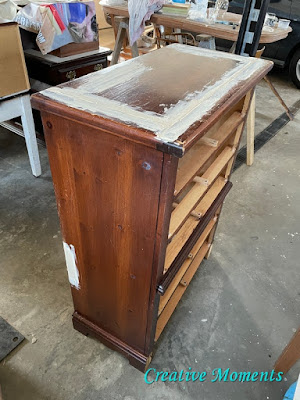
This pine dresser style was so popular in the 80's, I myself bought my first bedroom suite in a very similar style. But lets take it out of the 80's ok?
It is a made in Canada product which I always like to find.
As always the first step is to scrub inside and out super clean. I like to use warm soapy water with Dixie
Belle white lightening cleaner added then rinsed well with my spray headed water hose.
I wanted to fill in the top groove. I hated this when I had my set too as this "detail feature" just collected dust and bits of whatever. Dixie Belle mud was used with a spatula to fill it all in. Let dry well.
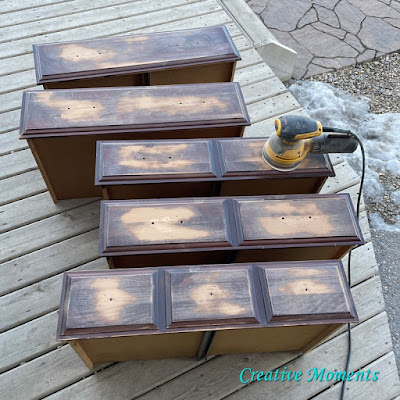
I prefer to sand outside so on a nice winter day here in Canada (plus 5C) I hauled it onto my deck and got busy sanding.

My shop dog Harley likes to supervise my progress.
I sanded the entire top right to bare wood and then some to remove all the dings and gouges.
The drawer fronts were next to be sanded a few days later.
The rest of the dresser body was sanded where needed as well.
There are always a few repairs on furniture pieces. Various sizes of clamps are handy to have.
Pine can bleed thru around the knots, also raw wood accepts paint differently then sealed wood so to alleviate this I used Dixie
Belle BOSS. It was brushed over all sanded areas using a Dixie
Belle chip brush to provide consistency for the next steps.
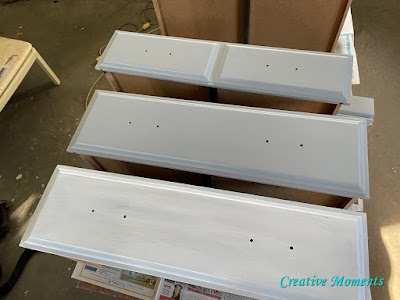
Two angles of the first drawer front painted. You can also see more Dixie Belle mud along the back edge. You will see areas that need more once the first coat of paint goes on. This is just fine to apply again as more layers of paint will cover it.
Then the rest was painted the first coat of cotton. To help smooth and blend the paint layers I like to use a Fine
Mist Spray Bottle on the surface and oval brush from time to time.
I like combining these two colors for added dimension and age to a piece. Above the lower and middle edges are being worked on.
Then the bottom two drawers, this shows how the waxes warm the cool white and underlying grey colors.
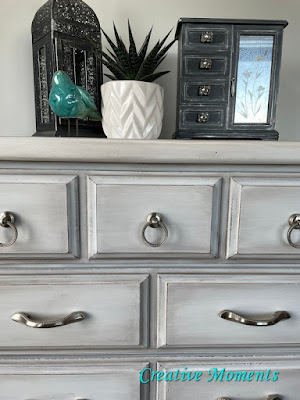
The whole dresser is now dark waxed.

Now to wait for the new hardware to arrive.
They are such a nice weighted hardware and will update this dresser.
Love the ring pulls too!!
It looks so much better and totally modern farmhouse 2020.
here is a video view of this beauty

I added this adorable shades of grey jewelry box I created using Dixie Belle paints a while back while staging. It is on my Etsy Store if you are interested.
Links to Dixie Belle products are for your convenience. My affiliation with this fantastic paint company does not increase prices on your end, your purchases via my links does however provide a small subsidy which allows me to keep providing these tutorials. Thank you!
FEATURED ON
Shared up at these link up parties


Su h a great makeover. It was kind of hard to follow the steps but it is 5 in the morning. May be me. Did you wax around the edges before the wax?
ReplyDeleteHI Cheryl, sorry you found the steps hard to follow ;( But seeing it is 5 am your time I think your question might be not quite what you meant to ask either?
DeleteLOL, you are correct. So did you paint 2 full coats of Manatee and then 2 full coats of cotton and then kind of brush them together? That's what it looks like but 2 full coats of cotton ?
Deletesorry if my details were not very clear :) I painted a full coat of manatee then 2 coats of cotton. The cotton and manatee were blended around the edges on the 3rd coat (which was cotton) to add shadowing and depth.. and use a mister bottle linked to blend. This paint blends so nicely!!
DeleteGorgeous as usual.
ReplyDeleteThank you my friend!! Your support is always appreciated!
DeleteWhat an awesome transformation!
ReplyDeletethank you so very much for your kind words :)
DeleteLee Ann, your work at Creative Moments is truly inspiring! I love how you transform outdated furniture into beautiful, one-of-a-kind pieces. The 80’s tall boy dresser makeover is stunning—your attention to detail, from sanding to painting and distressing, brings it into the modern farmhouse era. Tall narrow drawers never looked so good!
ReplyDeleteThanks for sharing with us, I'm featuring you this week when the next To Grandma's house we go link party starts!
ReplyDeleteThank you so much, I appreciate you. See you Wednesday at the next party!
DeleteNew
ReplyDelete