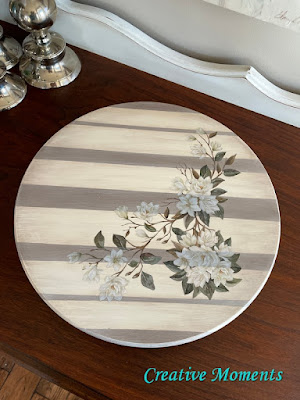
I have another lazy Susan rotating tray makeover for you. This one is rustic warm whites, browns and magnolias. See more of my lazy susans for other designs.
Links to the Dixie Belle products are for your convenience. My affiliation with this fantastic paint company does not increase prices on your end, your purchases via my links do however provide a small subsidy which allows me to keep providing these tutorials. Thank you!

A good friend gave me her IKEA wooden table spinner as she no longer wanted. Absolutely and thank you. It was cleaned well to be sure the surface was ready for the paint job. A light sanding with a Dixie Belle sanding
sponge followed by another quick wipe.
I laid out the magnolia Dixie Belle transfer I planned to use to come up with a layout. This is still part of one transfer package. You can see the other parts used on this serving tray, a wooden growth ruler and there is still lots left.
You can get many projects out of one tube.
Flipping it over and painting the rotating base is the best place to start. I chose sun kissed DixieBelle silk paint and applied with a small artist brush seeing the area was so narrow. Two coats were applied. This paint has a built in top coat and primer.
Then it was flipped over and the top painted changing to a 2" mini DixieBelle synthetic brush. Any of the synthetic brushes can be used with this paint but I am a big fan of short handled 2" brushes. Again 2 coats were applied leaving appropriate dry time between coats.
To add interest I added striped over the soft yellowish warm white with the limited fall color latte from the regular Dixie Belle Paint line. Painters tape was pressed over the light color.
I then moved the tape to create various widths of lines across the top. You could place all your lines on with painters tape and paint over but I hate to waste so reused the tape as I went.
Here is the end result of the latte lines.
Again I placed the transfer pieces on top to see the look I wanted to create.
I wanted to tone the contrast down between the 2 colors so did a wash of Dixie Belle Paint in cotton but it was too bright so added a wash of fluff. Once dry the top was sanded again lightly with the sanding sponge.
Time for the magnolia transfers.
Be sure to consider the layers they need to go in order of, remove the backing and place in position. Using the stick included in the package burnish in place.
To smooth in place you can use the Dixie Belle finishing pad to effortlessly glide over the transfers without catching and press firmly to the painted surface.
And this one of a kind cutie is complete.
video tour
Links to the Dixie Belle products are for your convenience. My affiliation with this company does not increase prices on your end, your purchases via my links do however provide a small subsidy which allows me to keep providing these free tutorials. Thank you!
FEATURED ON
Shared up at these fun parties


Congratulations, you are being featured on Thursday Favorite Things. I hope you stop by. https://www.eclecticredbarn.com/2021/12/thursday-favorite-things-party_0102321029.html
ReplyDeleteHugs,
Bev
Thank you so much for featuring this cutie and for hosting a fun weekly party! Happy New Year!
DeleteI love how you did the stripes but I don't understand how you did it. Beautiful job.
ReplyDeleteThank you, to create the stripes use painters tape and make stripes the width you want, paint a secondary color over and lift to reveal the stripes
Delete