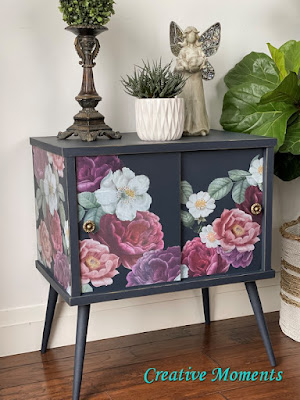
Bold floral, rich navy and a touch of gold give this vintage record cabinet new life.
I found this adorable vintage record cabinet on marketplace and saw so much potential in it. I did not know it was laminate until I picked it up but the frame and legs are solid wood making for a structurally sound piece.
It is the perfect size cabinet to fit in so many areas and would be perfect painted and adorned with pretty transfers.
A good cleaning was in order to remove years of wear. For laminate pieces I like to use a spray bottle with Dixie
Belle white lightning cleaner mixed with water and a rag to scrub. Scrub well then wipe again with a clean damp rag. There is this stuck layer of something that needs removing so ...
I left the damp rag sitting on the spot while I removed the screws that were added to the sides for some reason.
After a bit of time the stuck on stuff removed easily with a razor blade.
Over the years the frame had spread so with the help of my shop guy we clamped it into place, drilled pilot holes and tapped in finishing nails to keep the frame square.
The orbital sander was used on the top to smooth dings and scratches.
The one sliding door had corners chipped off. I did have a new hardboard shown under the door I could cut a new one from but I chose to rebuild the corners with bondo.
This will allow paint to adhere perfectly.
See how the backboard yellowed ? This is another good reason to add a sealing base coat.
Apply second coat after first one dries a couple hours. Let project dry well over night.
Links to the Dixie Belle products are for your convenience. My affiliation with this paint company does not increase prices on your end, your purchases via my links do however provide a small subsidy which allows me to keep providing these tutorials. Thank you!
Pro Tip: wash brush immediately after each coat to keep them in excellent condition.
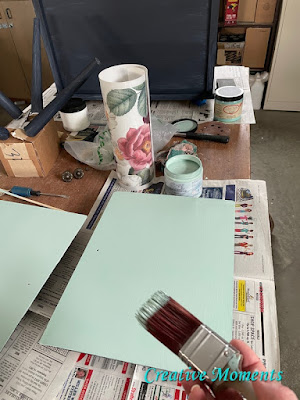
About 4 hours later both colors went on the cabinet for a second coat and left to dry overnight again.
The next day it was transfer time, this gorgeous one is Dixie Belle transfer called floral romance. I decided on placement, removed the backing and pressed in place. Using the stick in the tube rub it over and remove the transfer paper. The matching area on the next panels was cut to fit and repeated.
Pro Tip: Be sure to overlap the pattern at least 1 mm. I had to cut a wee narrow piece to fill the space having not done so on the first side.
The other side was done the same way but overlapped. :)
For the doors I cut out parts of the second package of the same transfer. Many were layered to get the look I wanted.
And here are the doors in place with the transfers.
Now to add a little glam. Using my finger I applied gold Dixie Belle Gilding Wax around all the edges and on the scrubbed original knobs that are so pretty.
video of how I apply gilding wax
This sweet little cabinet could return to holding records like originally intended but also makes a cute storage cabinet, a fabulous liquor cabinet, toys storage, books and so much more.
Here is a video view of this beauty.
Links to the Dixie Belle products are for your convenience. My affiliation with this company does not increase prices on your end, your purchases via my links do however provide a small subsidy which allows me to keep providing these free tutorials. Thank you!
Featured on
Hometalk Mar 12, 2022
Shared up at these fun parties


Very Pretty. Awesome job.
ReplyDeleteThank you for the kind words, very much appreciated :)
DeleteWhat a gorgeous makeover you gave this MCM record cabinet, Lee Ann. Love the colors and the floral transfer - stunning!
ReplyDeleteThank you Marie, I am really loving the bold florals on the navy too :)
DeleteVery unique. Multi use. Great job.
ReplyDeleteThank you very much, I totally agree, so many options for this cutie!
DeleteWhat an amazing transformation! I upcycled a media cabinet using stencils last year but I've never used transfers before. I think, I'm going to have to find another furniture project so that I can try out these gorgeous Dixie Belle transfers for myself!
ReplyDeleteThank you, yes you must try some, they are such fun and give such a beautiful update to many pieces
DeleteWhat a difference! Your cabinet looks beautiful!
ReplyDeleteThank you so very much for your kind words!
DeleteLeeAnn you did an amazing job on this record cabinet! The paint color and the transfer are perfect together 😊
ReplyDeleteThank you Cindy, I appreciate your kind words!
DeleteLeeAnn, you must have some kind of magic, because everything you transform is divine! This new project is beautiful. You've given me ideas for some of my furniture! You were the most clicked from the party, and it is well deserved :)
ReplyDeletehugs,
Rachelle
Awe Rachelle, your words just made my day!! THANK YOU!!!
DeleteLeeAnn, you must have some kind of magic, because everything you transform is divine! This new project is beautiful. You've given me ideas for some of my furniture! You were the most clicked from the party, and it is well deserved :)
ReplyDeletehugs,
Rachelle
Thank you so very much, this comment was missed all those years ago
DeleteHi LeeAnn! I enjoyed this post so much and I wanted you to know that this post will be featured in the next Tuesday Turn About Link Party! I realize you might not recognize me as a host for the link party - but starting next week I am one of the new hosts! Thanks for sharing your furniture makeover and I hope to see you at next week's party! 😊
ReplyDeleteThank you Cindy, I am very excited to be featured and congrats on being a host. I enjoy this party each week!
DeleteThe flowers are beautiful!
ReplyDeleteThank you, I am loving them so much!
DeleteI just LOVE it!! Great job!!!
ReplyDeleteThank you very much, appreciate the kind words
Delete