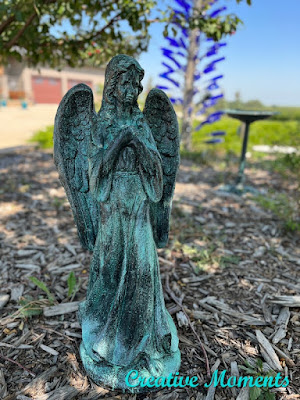

This garden angel was an anniversary gift from years ago. She has seen a few seasons of varying weather here in western Canada. It was time for a relove. I had always envisioned her in a pretty blue green patina. I am loving the end result. Let me share how I gave her this new look.
Scrub the piece well on all sides. Rinse well.
Then let dry well.
This rich dark brown was lovely on its own as you can see going on in the above right photo. But it is going to get even better.
I brushed on 2 solid coats and let dry well.
This is a new container. NOTE: the dried on chunks on the lid and surface are the metal flakes. These cause the chemical reaction and are needed. Carefully scrap them back into the tub and mix thoroughly to incorporate them into the paint before applying to your project.
The angel was then stood up and the entire statue covered in the first coat of bronze paint. This layer needs to dry then a second coat of bronze
Patina Paint. This is where you need to be ready to move. The
Dixie Belle Patina Spray must be applied while the 2nd coat is wet!
TIP: Start on the back side of large projects. It was a very hot day when I was applying. The second coat of metallic paint needs to be wet when the spray is applied. I worked in 4 quadrants starting on the front lower half. This was so the spray would run down and allow the bronze paint to go on the top without any spray contaminating it. However it did leave a line. If I started at the back there would be a natural line at wings lower edge.
The chemical reaction happens fully over a few hours. This is what it looks like nearly dry.
I did touchups after it was completely dry, I dabbed on the bronze paint in areas I wanted to add more (along the front line for one) then sprayed lightly again. I also highlighted edges where the bronze would look like it was worn over these sprayed areas.
I am loving the look.
The gator hide does have a bit of a sheen but it dulls more as it dries.
Check out the video view of this cutie.
After a few days of drying she was put back in my garden.
Links to the Dixie Belle products are for your convenience. My affiliation with this company does not increase prices on your end, your purchases via my links do however provide a small subsidy which allows me to keep providing these free tutorials. Thank you!
FEATURED ON
Hometalk Jan 5, 2024
Shared on these fun link up parties


Love this patina LeeAnn! Looks like copper, my husband and I are big fans of copper. That patina always pulls at our heartstrings.
ReplyDeleteThank you very much, I am so pleased with my end result! Copper is such a pretty metal to patina :)
DeleteThis turned out amazing! It literally looks like verdis gris copper. Thank you for sharing this post on the Home Imagined Link Party.
ReplyDeleteThank you kindly and for hosting each week :)
DeleteI love the result and the how to. Great post.
ReplyDeleteThank you kindly Jeanne, I appreciate you kind words!
DeleteDiana - this process restored her to her greatness. Really brought out the details in her face and wings. Nicely done!
DeleteThank you Anonymous :)
DeleteNice article! Keep up the good work and keep writing.
ReplyDeleteWhat a great transformation, well done. love it
ReplyDeleteThanks so much for participating and sharing at SSPS 324. See you again next week at #325 https://esmesalon.com/tag/seniorsalonpitstop/
Thank you so much for the kind words and hosting a fun link up party
Delete