This is one of the custom-painted dressers I recently updated.
I always cherish the stories behind these pieces. This Mid-Century Modern (MCM) dresser set, originally belonging to a young man’s grandparents, got a fresh update. It’s incredibly rewarding to give these pieces a modern look while preserving their sentimental value. I love seeing furniture stay within families and continue to serve them for years to come. Thank you Kurtis for entrusting me to your vision.
The set is made by Koehler in the early 1960's
This vintage long dresser and the tall boy: tutorial coming soon, below will be given new life to continue being part of a family heritage.
the tall boy in my work shop getting prepped for its makeover
These 2 photos are the long dresser in the young mans bedroom in use.
The inset pieces on the front center drawer is turned out and this is the look he wants to show on all the top drawer fronts.
white lightning cleaner comes in a spray bottle now which is perfect for projects like this. Spray, wipe or scrub then wipe again with a clean damp cloth. All surfaces were cleaned.
Many areas on the veneer required a bit of wood filler. Once dry the surfaces were sanded smooth then wiped again with a damp clean cloth.
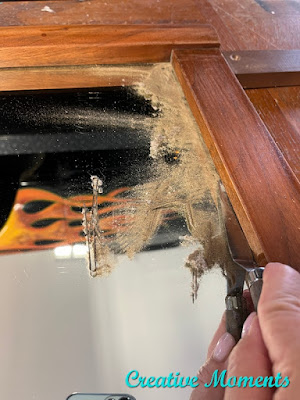
The base of the mirror had collected many years of dust so I used my offset spatula to get in the tight space and bring the dust out. The shop vac removed all the excess dust bunnies.
On mirrors, many times I push smooth paper under the edges to make painting easier. Once in place the anchor Dixie Belle silk mineral paint was ready to go on. I used my favorite mini synthetic brush to apply. This paint is like silk to work with.
Remove the papers while the paint is wet. They will stick if they dry creating a whole new problem which I have learned from in the past :)
The rich black color is just what the young man wanted.
I carried on with all the drawer fronts and the sides.
The base was laid on it's back on a work table allowing me to get to the legs much easier. They were power sanded smooth to bare wood as had dings and chipping finish from years gone by.
The legs and frame were painted and once all the paint was dry it has a light sponge sanding to be sure there were no bit of anything on the surfaces and makes the paint silky smooth.
2 coats were applied in total with the final coat getting a light sanding as well.
I also did the arborite top to give it a bit of shine and love.
Moving on to the original hardware, it was in need of an update too. Solid black is the plan.
After they were scrubbed well and very dry, black satin spray paint was applied in many light coats starting face down to get the back sides done first.
Have you tried the spray paint trigger yet? it really helps to spray even coats without a sore pointer finger.
Then flipped over and the top surfaces spray painted.
Spray painting original hardware gives it a fresh new look and saves money. As well it keeps yet more things out of the landfill.
The inserts were screwed back in place along with the freshly updated hardware.
And this long dresser is ready to get back to work.
The mirror had it's insert put back in place too.
Being such a large piece as well as being a custom painted piece I attempted to take finished photos in my garage. This is always a challenge especially with a mirror that captures everything.
I did use a photo editor to add this bedroom scene to the mirror which looks better.
I also tried adding a black border to this angle which wasn't bad either
This is back home in his bedroom hard at work, thanks for sharing Kurtis
Links to the Dixie Belle products are for your convenience. My affiliation with this company does not increase prices on your end, your purchases via my links do however provide a small subsidy which allows me to keep providing these free tutorials. Thank you! Please note the Amazon affiliate links are for your convenience to see the products I used as well. Ordering via the link may get me a small commission but does not affect your pricing. Thank you if you do choose to order them.
FEATURED ON
Shared on these fun link up parties


Excellent transformation from much-loved and well-used to modern and just right for the customer's pleasure
ReplyDeleteThank you, I was happy to create the young mans vision :)
Delete