Loaded with character, this antique dresser was reloved in a light and airy farmhouse white finish with a touch of sparkle.
This project was TONS of work but it was all worth it in the end. This tutorial is very photo heavy as I hoped to share each challenge and how it was conquered. I hope you make it to the end to see the video tour of this huge transformation.
It is water based which is crazy but after a few tips from the company rep I had success with it. Seeing it was water based I applied it with a
Fusion Chip Brush in a fairly thick coat and left to sit for a bit. This formula takes longer to work then old school strippers so patience is the first step.
I also put a recycled garbage bag over to prevent evaporation in the heat that I had used on another dresser. I am glad the plastic can be reused as that is my mantra. Once the old finish started to lift I used a metal scraper to remove.
watch the stripper in action
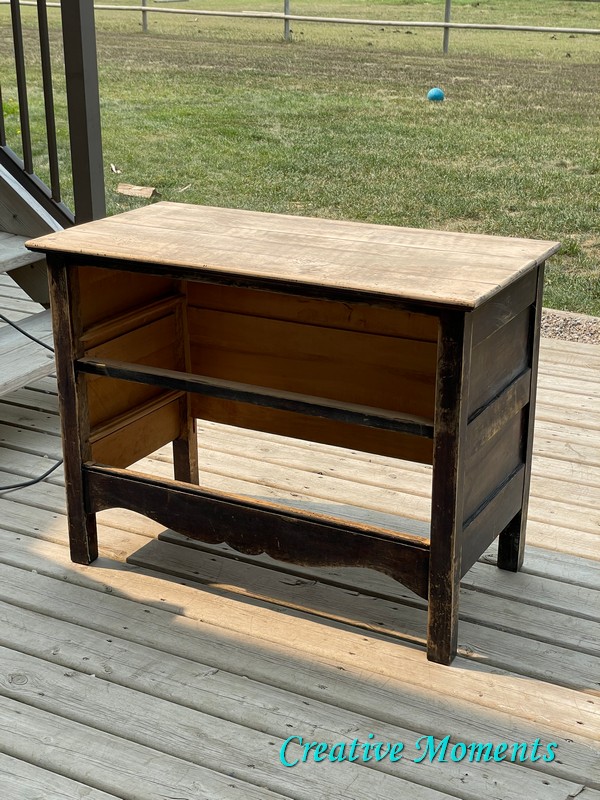
Now to address the body of the dresser.
This dresser is very old; I purchased it from my husband's uncle's cousin who had it passed down from her grandmother (Her father would be 95 now if alive so this beauty is well over 100 years old!!
Years of use and then storage had accumulated lots of dust and grime requiring a deep cleaning. I like to use warm soapy water with
Fusion TSP
Alternative and scrub with brushes in all the nooks and crannies inside and out then rinse well and let dry.
Anyone know the rest of the letters for the maker company?
Once dry I removed the mirror off and you can see the original color was a natural oak.
The base was hauled outside and sanded to bare wood in hopes of staining it.
However there was allot of dings and
such over the many years so I wood filled many of the holes with DAP premium wood filler.
While the wood filler dried I hauled out the top to start sanding however I decided to take it apart for better access.
Flipping it over I removed the mirror and the wooden shelf with drawer. Again you can see the original color of the tiger oak.
Back outside I was able to really get in all the areas. The "stain" that was used accumulated and was gunked up along the lower edge. My handy
carbide
scraper from Richard tools worked perfect to remove this all easily.
Then it was back to power sanding.
To rehydrate all the wood inside the dresser (this includes inside/outside drawers all except the front) I used
Dixie
Belle Big Mama’s Butta which if fabulous for restoring the wood as well as ridding the piece of "old" smell. It is truly a miracle worker on smells and comes in 2 scents and non scented as well.
Almost all antique drawers need repair so this one was glued and clamped and left to dry.
The other drawer had a broken off edge that needed to be repaired.
Once I had enough in place I removed the ruler and allowed to dry for a few days.
And then power sanded smooth but it seems my idea did not work. No fault of the product as it is a wood filler not builder but I wanted to try and see, you never know right?
So all was pulled off and a plan B researched.

I really do like it as a wood filler though ;)


Of course this drawer required reqluing as well. I like to use an artist brush to get the wood glue in all the dove tail areas to secure it well for years to come.
Then clamp and let it dry well too.
Now to paint this beauty. I chose
Fusion Milk Paint in the color London Fog. Above right is the first coat going on. Don't be alarmed milk paint has an ugly stage ;)
PS if you use my affiliate link to order milk paint you will save 15% off at checkout!!
After 2 coats were on I noticed a difference in the white colors on the bare wood areas (tannins leech thru) and the old finish areas. I totally forgot to seal the wood areas to keep the colors the same. Luckily this is easily fixed by spraying on a few coats of
Zinsser
Bull's Eye spray shellac .
All pieces were painted 3 coats of this warm white color allowing each coat to dry before adding another. There is a big change already.
Plan B for the drawer edge was another new product I have been avoiding - Bondo. But after much research and YouTube videos I felt confident to give it a try. I also wanted some stability along that broken off edge for the Bondo to stick to kinda like rebar in cement. I used my power stapler to add this support.
I applied painters tape in front of a plastic ruler as my straight edge; mixed the Bondo components and got it applied quickly along the edge.
Once it was dry I power sanded it smooth as butter.
And this product worked amazingly, why was I hesitant?
It was sprayed with shellac right away and the 3 coats of milk painted applied.
In my opinion antiques need to look their authentic age. All the work that goes in to repair, repaint and make "new" again also requires steps to add age and character back into the piece. I personally like minimal distressing with not only adds those qualities but it also provides forgiveness when a piece is bumped or dinged. I like to use this
RAD pad by
SurfPrep in fine grit.
Distressing also brings out the details on carved areas too.
Of course while doing so don't be surprised if pieces may release and need regluing. I add a piece of plastic between the clamp and paint to keep the paint unmarked.
The carved details are clear waxed
Age, dimension and details popping all successful.
The ageing wax was applied in all other nooks and crannies where dirt would collect. I like to use a
Fusion Chip Brush dedicated for this application and wiped back with a j-cloth.
Edges in action
And it looks like the other end of the drawer needs regluing :)

Now the mirror was complete on the front I flipped it over again and put the mirror back in place. To be sure it was secure I added new glazier points with a wee bit of paper between it and the mirror surface to prevent scratching.
The ugly hardware that came on it was not original so all holes were wood filled back at the start of the project to start fresh. The new pulls were ordered to fit the original holes. I drilled new holes from the inside with my cordless drill.

I wanted the solid brass shininess toned down and to look aged so a quick spray with Rustoleum oil rubbed bronze spray paint wiped back with a green scrub pad worked perfectly.

They look amazing don't you think?
And for the little drawer I found an antique pull I had in my stash from a past project that works well.
I LOVE this piece, even with all the work it took it was all worth it.
Shared at these fun link up parties


Stunning transformation! You were not kidding that it took a lot of work. I didn't know the trick about the shellac so thanks for sharing that. #HomeMattersParty
ReplyDeletethank you for your kinds words and so glad I can share valuable information ;)
DeleteThis is a totally amazing restoration and I love seeing your detailed and comprehensive DIY photos!
ReplyDeleteI restored a dresser and mirror similar to this years ago, and it was really a lot of work. It's gorgeous. Thanks for sharing at All About Home last week. I'll be featuring this post Monday evening.
Thank you for your kind words and for featuring this project, I really appreciate it allot!
Delete