You know how much I love antique dressers! Follow how I gave this one a classic black makeover.
I was supposed to be on a buying freeze but when I saw this one on a bidding site I put on a bid not thinking I would get it but sure enough I did. I knew it was missing the mirror but did not look closely and notice the damaged drawer front.
Miss Harley gave it an inspection when it arrived at the shop and approved.
And buying on a bidding site does not let you see inside the drawers which had sticky residue and mismatched contact paper in rough shape. These sticky pieces were removed first thing.
And it was DIRTY inside. Next order of business was a deep cleaning with soapy water and TSP, a scrub brush and hose. It actually had two cleaning sessions, the second after dry and the mirror harp removed. It was yucky under the removed boards, so everything was scrubbed well again.
These antique pieces have been around for years and many have been stored in inclement spaces accumulating all kinds of dirt and grime. Do not be afraid to really give them a good thorough cleaning and rinse well.
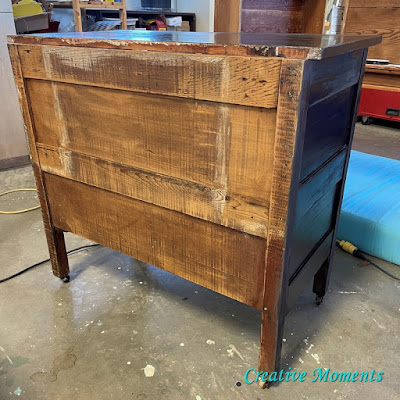
The missing mirror was not an issue as I thought about adding a chalk board or chicken wire for a fun change up for the mirror space but seeing the "repair" on the back (again not seen or noted on the bidding post) with mismatched L brackets and thick moldy smelly plywood boards I changed my mind.
The mirror frame needs to be removed. The boards holding it on to the base were screwed on with about 39 various sized screws. The gross gunk trapped under them was scrubbed off as well as another cleaning of the whole dresser body.
Wood filler was used to fill in some gouges and a crack along the side. When dry, everything was hand sanded to smooth all surfaces.

Addressing the broken drawer front I thought of using my handy wood filler fix but knew it was chancy that the edge may snap during use.
My handyman husband had an idea to router out the damaged area
making a level surface squared off as much as a router can.
I had a sample stain wood board that was cut to fit and smoothed with my hand planer.
It was glued in place and clamped as well as a few other glued and clamped areas.
The next day DAP
wood pro-x wood filler was added in layers and left to dry fully overnight. The next day it was power sanded smooth with the edges rounded to match the existing drawer edges. This was the perfect fix.
Once all the cleaning and repairs were complete it was time to paint. I mixed up little black dress; a rich black from Fusion Milk Paint color line.
I love how easily it mixes 1:1 with warm water and smoothly brushes on. I used a 2" angled Zibra brush that works perfect for flat surfaces and straight edges.
To address the back edge a piece of solid oak was cut to fit the lip perfectly.
It was screwed after pilot holes were drilled to fit flush then milk painted black to match. A second coat of little black dress was painted on all drawer fronts and body and partially on the back for a more professional look.
To spruce up the sides and add an element of fun the drawer sides inside and out were painted in Fusion Mineral Paint inglenook; a soft green.
A pretty black and white floral contact paper was cut to fit and line the drawers.
The perfect sealer for a dark milk paint is Fusion Hemp Oil. I like to apply with a Chip Brush I keep dedicated for this purpose. Allow it to absorb for awhile and wipe with a lint free cloth.
watch as the hemp oil absorbs video
Everything is almost complete.
The hardware (which is not original in my opinion) was scrubbed and put back on.
Against the black the aged gold looks lovely but they can easily be painted or swapped out in the future.
The original casters roll well and make moving it super easy. Scroll down for a video tour :)
closed.. and open
I love the pretty green lined drawers, you?
take a virtual tour of this classic beauty
Please note the Amazon affiliate links are for your convenience to see the products I used as well. Ordering via the link may get me a small commission but does not affect your pricing. Thank you if you do choose to order them.
FEATURED ON
Shared on these fun link up parties


What an amazing transformation. I love it! Visiting from Wednesdays in the Studio.
ReplyDeleteThank you so much Amy :) I appreciate your kind words
DeleteThanks for sharing with us, I'll be featuring your this week when the next to Grandma's house we go link party starts!
ReplyDelete