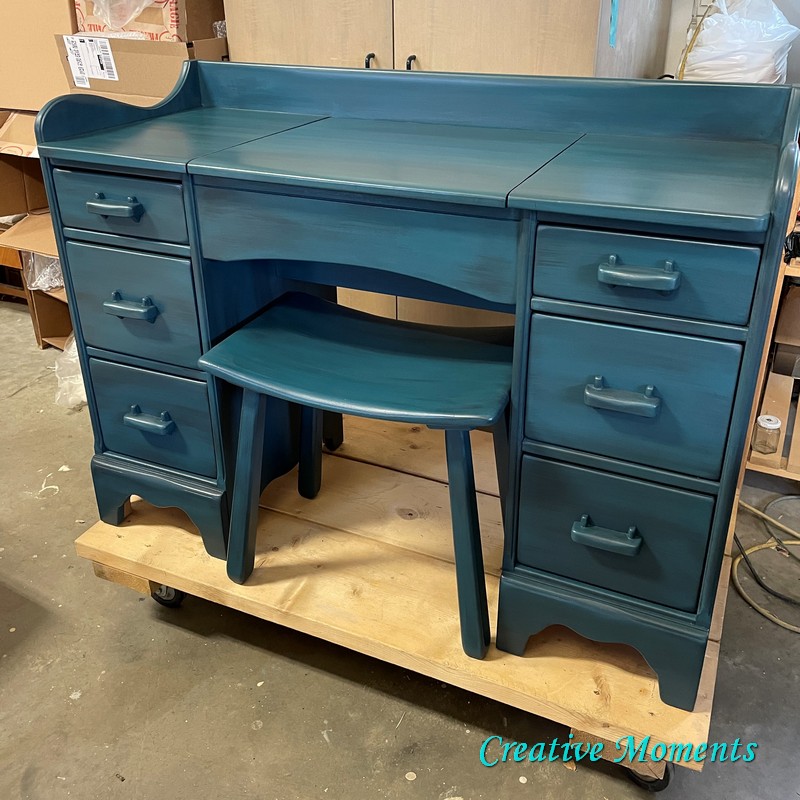
This antique vanity was custom painted based on an inspirational photo. It now has a complete new updated look.
This is the customer's great grandmothers vanity. She remembers playing cards with her at it when a little girl. How sweet are those memories? So worth getting a piece reloved to fit your home decor.
The construction is so well made from solid wood again another huge reason to invest time and money into a makeover.
The first step was to take it all apart and scrub inside out and upside down to remove years of use. I use Dixie
Belle white lightening cleaner in a bucket of soapy water, scrub with a brush then rinse clean with my hose.
Pieces are then towel dried and left to dry well.
Everything gets set up to be painted.
The original finish has wear of course so to smooth it all I hand sand using Dixie
Belle sanding sponges and old orbital sanding pads to smooth everything. Once done all was wiped again to remove the sanding dust. The customer wanted an aged black and teal blend like this inspiration photo she sent me above (not my photo).

Then a layer of antebellum blue, I think it looks very close. The customer approved and it was on to paint everything.
Once the stool was complete it was on to the drawer fronts repeating the process; paint in midnight sky, add antebellum blue, mist if needed and blend.
On to the vanity body, above is the last of the blonde wood being covered in the charcoal color.
The base in black.
On goes the blue; so pretty but it is a color I love :)
Colors change as it dries too. Once the drawers were set in to test the inner edges of the base required painting further in. Painters tape was added while some were freehanded.
Then it was on to the sides; blue over the black and blend.
Last painted pieces were the drawer pulls, again the same layers.
PRO TIP: affix to a piece of carboard with screws and the board can be picked up and turned in all directions to get paint in all the nooks and crannies.
I set everything together to show client and had forgot the flip top: all good now.
The customer wanted just the blue color inside but I suggested a lighter funner pop of blue. This was the approved color out of a few choices.
It is perfect, again it is one of my favorite colors. It required 4 coats having a clear base and applied in thin coats to prevent drips and globs.
I added a bit in the other creases along the lower edges too.
I put the mirror back in and that is a wrap.
This process took 14 hours in case you wondered.
This color changes in different lighting; chameleon like.
Once I had help to move it all inside I could stage it properly.
See how the colors change? Albeit the above left had an Instagram filter added.
Then I opened the flip up mirror for next photos and found the corner of the mirror had cracked :(
I was crushed but set about finding a replacement.
It seems that replacing an antique mirror is not as easy as one might think.
Even though it is fairly small it is thick at 5 ml, the edges are beveled and polished (charged per inch) and then it needs 4 holes drilled; one at each corner for the screw again a fee per drill.
The interior color is so fun to see once opened.
video view
I had lilacs bloom while waiting for the mirror to be custom cut so took a few more photos.
Then peonies bloomed so I had to share them too!
And finally the custom mirror arrived retailing at $250!
This was a big lesson for this little business, going forward there will be a caveat stating all glass and mirrors must be removed before drop off or not liable :)
But all is well for the customer as she has her great grandmas vanity in the color she requested with a beautiful new mirror that was given to her in bubble wrap to put in once she had the vanity set up in her home.
Links to Dixie Belle products are for your convenience. My affiliation with this fantastic paint company does not increase prices on your end, your purchases via my links does however provide a small subsidy which allows me to keep providing these tutorials. Thank you!
FEATURED!!
Shared at these great link up parties


The end result is so beautiful. And with your step-by-step instructions I actually feel like I could do it. Congratulations on being featured on Sundays on Silverado.
ReplyDeleteThank you Janet for the kind words and the feature!!!
DeleteThe end result is so beautiful. And with your step-by-step instructions I actually feel like I could do it. Congratulations on being featured on Sundays on Silverado.
ReplyDeleteTHANK YOU for the kind words and the feature, both are appreciated!!
DeleteThe end result is so beautiful. And with your step-by-step instructions I actually feel like I could do it. Congratulations on being featured on Sundays on Silverado.
ReplyDelete