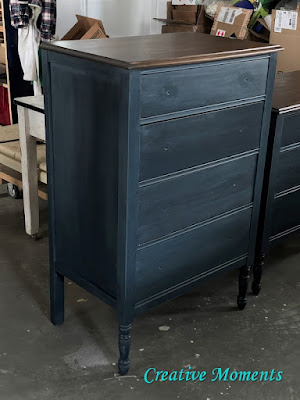
Milk paint and antiques pair so well, here is a custom antique dresser I just refinished for a great client. Let me share what I did to get this look.
This tall chest of drawers has seen allot of wear over the many years of use but is so worth reloving. Just look at the classic bones.
It was manufactured by The Meaford MFG CO (circa 1900's) and sold at T Eaton's in Calgary. I just love when these tags remain intact on a piece and always save them to put back on once finished.
Now it was time to give this dresser a deep scrub. I like to use
Fusion TSP
Alternative in a bucket of warm soapy water and a scrub brush. See the dirt and grime washing away?
Once all the pieces were cleaned inside out and upside down they were rinsed well and left to dry. This is 2 dressers the client sent to be made over; this chest and a
shorter mirrored dresser. They seem to be matching in style but not wood species.
It is crazy to see the original finish in almost perfect condition under the hardware pulls. These pulls gouged circles over the years being spun around.
While it soaked I moved on to the goug
ed drawer fronts. DAP
premium wood filler was applied with a metal spatula and left to dry well.
When the finish was ready a few hours later it was scraped off to show the beautiful grain. Once all the "gunk" was scraped off a green scotch brite pad was used with clean water to remove any stripper left and neutralize the top.
When the wood filler was dry, the drawer fronts were hauled outside to power sand smooth. The front was wiped clean of sanding dust and on to the next. (above 3 are done with 1 to go)
Now to paint the base after it was hand sanded with the large
Richard Tool Sanding Sponge to remove any loose finish and smooth areas then wiped clean with a damp cloth.
The client asked me to surprise her with the body color suggesting the colors she liked to go with a requested dark stained top. I wanted the colors to be fun but classic and look like they had been done over the years.
Here is
poolside milk paint on the body above and drawer fronts below. Two coats of poolside were applied.
Using a
Richard
Tool Sanding Sponge the top was hand sanded after the stripping process, wiped to remove the sanding dust and ready to stain. My favorite all in one stain is
Fusion
Stain & Finishing Oil. And my favorite color is cappuccino. Isn't it lovely? I apply with a blue shop towel and wipe back once the coat is evenly applied.
It is such a rich brown.
Again both dressers (
shorter one) were done in the exact same steps.
Everything was sponge sanded to smooth the layers of milk paint and reveal the color layers. The edges were lightly distressed as well to keep the antiques feeling authentic. Notice the right drawer that is sanded looks much lighter, this is normal with milk paint.

To seal the darker milk paint colors I like to use
Fusion Hemp Oil. It soaks into the layers of milk paint and brings them back to the rich color which you can see on the above right drawer.
Here the oil is going on the sweet turned legs.
The excess oil can be wiped after about 20 minutes then buffed in the next day.
However the next day I did not like the 2 lower drawer colors once I put them in place.
Easy fix; repaint them, let dry, sand and reapply hemp oil. To add a bit more dimension I used black
Fusion Furniture
Wax on the edges once the oil was absorbed.
The original hardware was scrubbed well, dried then polished with metal cleaner. This took longer then painting it seemed but the difference was worth it. The 4 left ones have the perfect shine and patina combo compared to the dull single one yet to go.
The hardware was put back on and some photos taken to share with the client. She LOVED the colors.
And LOVED the dark stained top.


video tour of this beauty
The customer sent me a photo of this one and
the shorter one back home with sentimental items atop.
Shared at these great link up parties


Great job.
ReplyDeleteThank you so much for your kindness :) It is appreciated very much
Deletemilk paint and old furniture ... bliss indeed. you do gorgeous work!
ReplyDeleteThank you so vey much :)
DeleteAwesome, thanks for sharing with us I'll be featuring you this week when the next To Grandma's house we go link party starts! Happy November!
ReplyDeleteThank you, that is very exciting to hear :) See you at the link up party!
DeleteI so enjoy your furniture makeover projects each week. I always learn something. Thanks for linking up and sharing with us. #HomeMattersParty
ReplyDeleteThank you Donna, this makes me so happy to hear. It is why I do my tutorials to share with others :) Again thanks for hosting a place to share them.
Delete