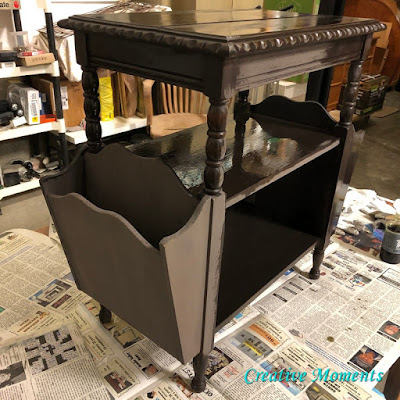
This relove was a big surprise once completed, let me share the process.
A kind neighbor gave me this sweet little table she hauled from home to home through her life having gotten it from her Grandmother. She always intended to refinish it but never got around to it. I was honored to be chosen to give it new life.
Under all the years of dust and cobwebs was a gorgeous solid wood beauty waiting to shine. As always the first step to the makeover was a deep scrub in every nook and cranny with warm soapy water with a bit of
TSP.
Once it was dry it was time to sand. There was a week of fair winter weather here in western Canada so I hauled it outside to power sand. This removed all the loose old finish and smoothed the wood.
Hand sanding was next to get in all the small areas the orbital sander could not reach.
Here it is all sanded and ready for the next step.
All surfaces were wiped clean of sanding dust.
It is very rare an antique piece does not need some repair, this one just needed the base of one of the side holders glued. I like to use my handy offset spatula to let in between the layers.
Then a board was clamped to secure and dry.
Finally the fun part, the painting. My aunt called this piece as soon as she saw the dusty dirty before photo above. She pondered a mustard color but then asked if I had a charcoal brown.
When I paint pieces brown is never a color I use often seeing they are usually brown wood but it is her choice.
I did not have a charcoal brown but one of the great things about milk paint is you can mix custom colors easily. I mixed
Homestead House milk paint colors sherwood brown and coal black. You can see the new custom color above on the bottom 2 shelves and spindles, what do you think?
video of the milk paint going on
And above it is drying which goes lighter.
The entire table was sanded with a sanding sponge and the edges distressed to show wear. Then it was sealed with
Fusion Hemp Oil. This is perfect for this antique piece as the
hemp oil not only absorbs into the milk paint but the dry wood fibers.
It also deepens the color.
I wanted to add interest and depth so while the
hemp oil was wet I used a sanding pad to wear more areas.
I LOVE the wood grain still shows and that the piece has imperfections that give it character .
The
hemp oil is reapplied till saturated then wiped back and let dry. In the future more can be added as needed as well.
To add even a bit more dimension and depth
Fusion Furniture
Wax in black was brushed on with a chip brush and wiped back with a blue shop towel.
I am totally loving the new worn and weathered brown finish.
I now will add brown to my color options going forward.
It is truly beautiful and very authentic to this antique cutie.
Check out Homestead House Paint Co.; this is my affiliate link but prices are not increased using it. It does give a small commission so I can continue to share these free tutorials with you to help on your milk paint learning journey.
FEATURED
Jan 11, 2021
Linked Up to these Parties


I simply love it. You have the best before and afters.
ReplyDeleteThank you Rebecca, that kind comment just made my day! Merry Christmas!
DeleteThat table turned out so adorable. Love it. Congratulations, you are being featured at Thursday Favorite Things. I hope you stop by. https://www.eclecticredbarn.com/2020/12/thursday-favorite-things_30.html
ReplyDeleteHappy new Year.
Hugs,
Bev
Thank you so much, apologies for such a long delay as I found these comments in a hidden moderation folder :(
DeleteSorry I missed the feature but very much appreciate it!!
What a great job and such a unique table. We are featuring it over on the Farmhouse Friday Link Party. Thanks for sharing the process . Hope you link up again soon. Happy New Year!
ReplyDeleteThank you so much, apologies for such a long delay as I found these comments in a hidden moderation folder :( thanks again for the feature!!
DeleteI love wood furniture. Old wood furniture. Ive never refinished in my life, but it is something i would like to do.
ReplyDeleteYour piece is absolutely beautiful.
You should be very proud of it
Thank you so much, apologies for such a long delay as I found these comments in a hidden moderation folder :(
DeleteLove this, it turned out so beautiful. I have an old tea cart that could use this kind of treatment, I would have never thought of a brownish color for it either. Thanks so much for sharing the inspiration I've been looking for.
ReplyDeleteThank you Deb, I have to say I was not thinking brown to start either but love the end look ;) So happy to inspire others, cheers!
Delete